|
ALL THE LAYOUT'S A STAGE
|
|
| |
| Even if you have
never read any of Shakespeare's works you will most
likely have encountered his famous line stating that
"all the world's a stage" (taken from As
You Like It). |
| |
 |
|
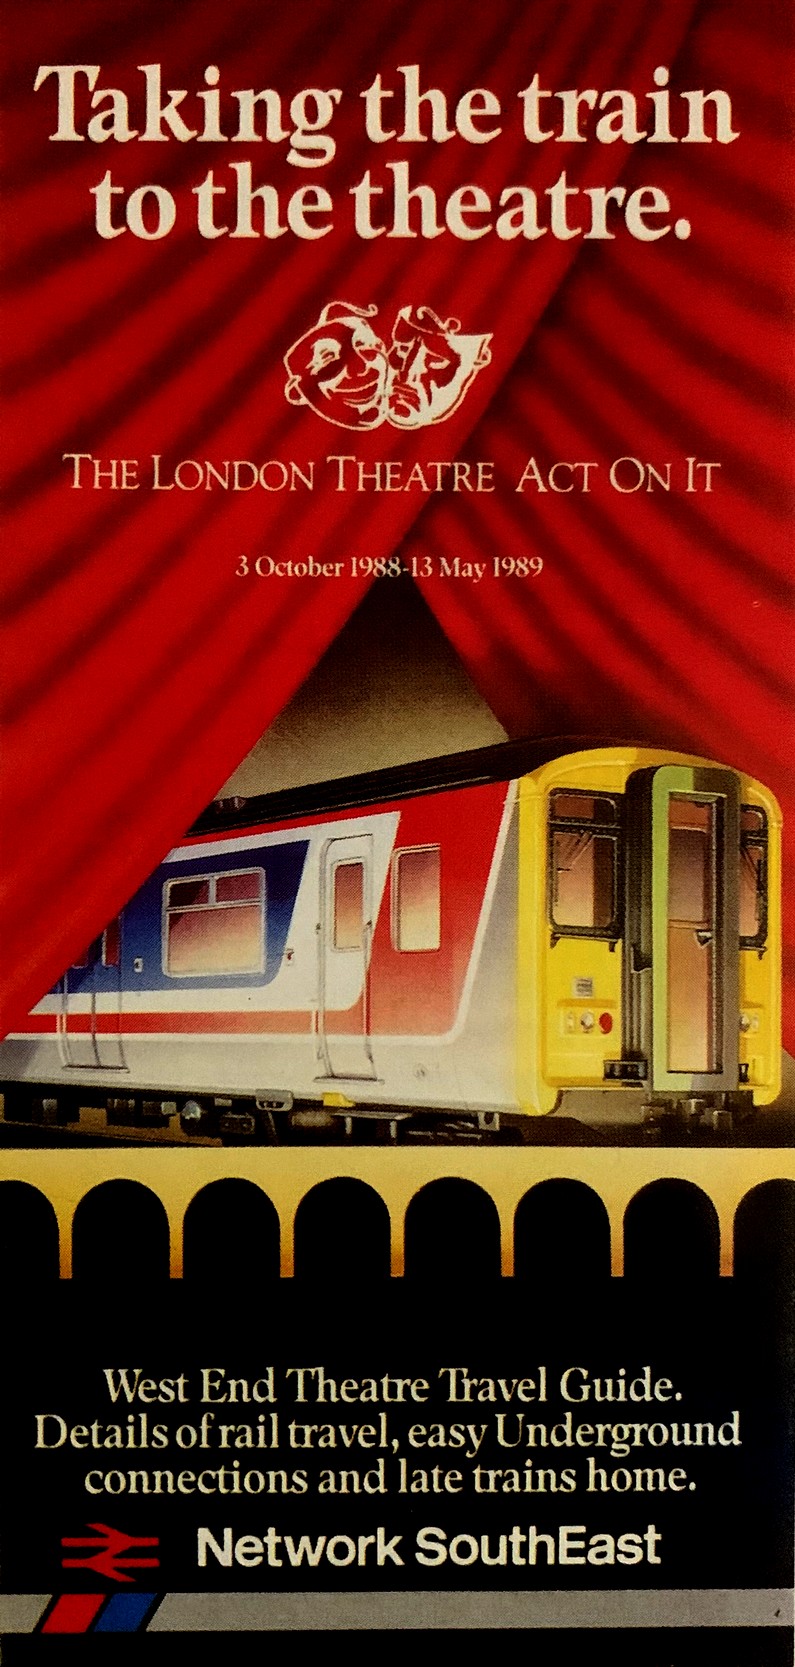
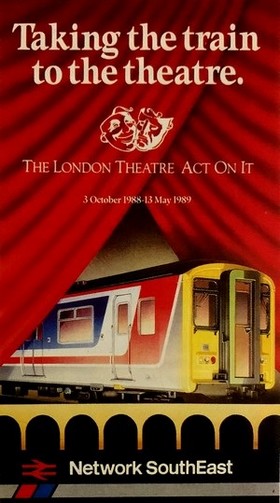
When Network SouthEast, the
British Rail passenger sector mainly
operating commuter trains within Greater
London from 1986 to 1994, launched an
advertising campaign in 1988 showing a
Class 455 electric multiple unit on a
theatrical stage, they probably weren't
thinking of Shakespeare's famous line.
The resulting image does, however,
provide a nice illustration for what
Frank Ellison had stated for model
railways in 1954:
"A
layout is a stage
on which
the buildings and scenery are the
setting,
the
trains are the actors,
and
the operating schedule is the plot."
Ellison
(1887-1964) was an early figurehead of US
model railroading and a prolific writer
of articles in the American modelling
press from the 1930s to the 1950s. He had
spent several years in the theatrical
business and
this experience greatly influenced his
ideas on model railway design, calling it
"theatrical layout design".
The comparisons
and references make sense, not only
because a theatrical production and a
model railway layout both attempt to
"carry out the illusion of
reality", as Ellison put it.
Some of the best
layout design tricks used today are
borrowed from the theatre (such as view
blocks and low relief props) and even
reflect theatrical terminology
("staging tracks"). Ellison
called them "stage tricks for small
layouts", and while they can all be
used as isolated design elements, viewing
and understanding them in the original
context of Frank Ellison's theatrical
layout design opens up a whole new
perspective on how to think of, design,
view and operate a small shunting layout
or shunting puzzle.
|
|
| |
|
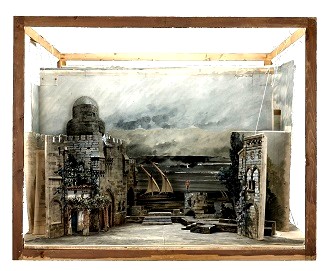
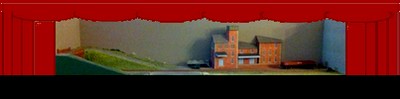
| A
theatrical stage provides a defined space in
which the scene is set and the actors move,
making it the focal point for the audience. The stage design model shown
here (created for an 1895 Paris production of
Verdi's Otello) defines and limits its
"viewing and acting space" inside of
what can basically be seen as a box. Small
layouts often work much the same way: their
"box" is usually more oblong than
square, providing more of a
"cinemascope" view (to borrow an image
from the movies), but provides a defined space
for trains to move in just as a stage does for
actors in a play.
This cube-shaped stage,
introduced during the Italian Renaissance in the
15th century, is still the most
common stage used in the West, with the
"viewing window" generally separated
from the audience by a more or less elaborate
architectural frame called the proscenium
(literally meaning what is "in
front of the scene").
|
|
 |
|
| |
| This frame, together with
stage curtains, also conceals the sides of the stage
(called wings), resulting in the familiar setup
which commonly defines what a theatrical stage looks
like. |
| |
 |
|
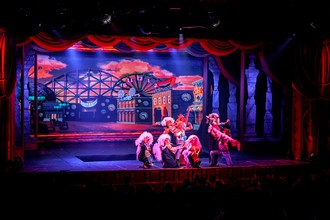
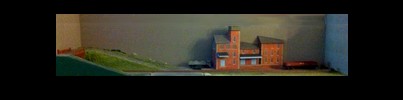
The
example of a modern stage production
shown here also illustrates other
aspects, such as a typically more or less
flat background at the rear of the stage
with additional stage elements placed in
the mid- and foreground. The resulting
forced perspective makes the stage look
much larger than it actually is, adds
depth and interest to the scene, and
allows the actors to enter and exit the
scene more convincingly. More
elaborate settings will feature
foreground viewblocks, half-relief props
and other means to influence the way the
scene is seen (or not seen) by the
audience.
Finally, the lighting
enhances the focal point character of the
stage, with the audience and most of the
proscenium arch in the dark.
|
| |
|
|
| It
isn't difficult to see how Frank Ellison
came to transpose the defining
characteristics of the theatrical stage
and a theatrical production onto model
railway layouts - and even though
shelf-layouts were practically unheard of
in Ellison's days, their similarity to a
stage is so obvious it almost goes
without saying. Some
smaller layouts - especially those
appearing regularly at model railway
exhibitions - even feature an elaborate,
all-around proscenium arch (which often
also hides an integrated lighting
system), although these are more commonly
described as "shadow box"
layouts, with reference to a type of
display case rather than a theatrical
stage. However, theatrical
layout design doesn't require replicating
an actual stage to that extent - "open top"
layouts work just as well.
|
|
|
| |
|
|
|
SETTING
THE STAGE FOR A MODEL RAILWAY
LAYOUT
|
|
|
|
| |
- The
insight and inspiration to be
gained from comparing a model
railway layout to the theatre
becomes apparent once you think
about "setting the
stage" - which is not about replicating
(providing an exact rendition)
but rather about representing
scenes of the real world
("re-presenting"
certain features while leaving
out others).
|
| |
 |
|
This is an especially
helpful approach for
small layouts, where
applying a degree of modeller's
license (taking
certain liberties in
modelling something) is
sometimes the only
feasible way to
"re-present"
real trains (or even just
one's own perception of
what a railway setting
looks like and where and
how trains do what they
do) on a model layout. The
similarities between a
theatrical stage and a
(small) model railway
layout become even more
apparent when looking at
the key functions a stage
is generally designed to
fulfill - almost all of
which immediately ring
several bells when
related to layout design:
|
|
|
| |
|
|
- establish the limits of and define the
"playing space"
- separate "onstage"
from "offstage"
- help define the "place and
time"
- create a "theme" and
"mood"
- direct the
observer's focus and attention by using
- selective compression &
forced
perspective
- low relief
& backscenes
- viewblocks
|
| |
| It's not just about models,
though - quite often real locations and railway settings
provide excellent examples of what can be replicated as
"theatrical stage settings". |
| |
|
LIMITING
AND DEFINING A LAYOUT'S SPACE
|
|
|
|
| |
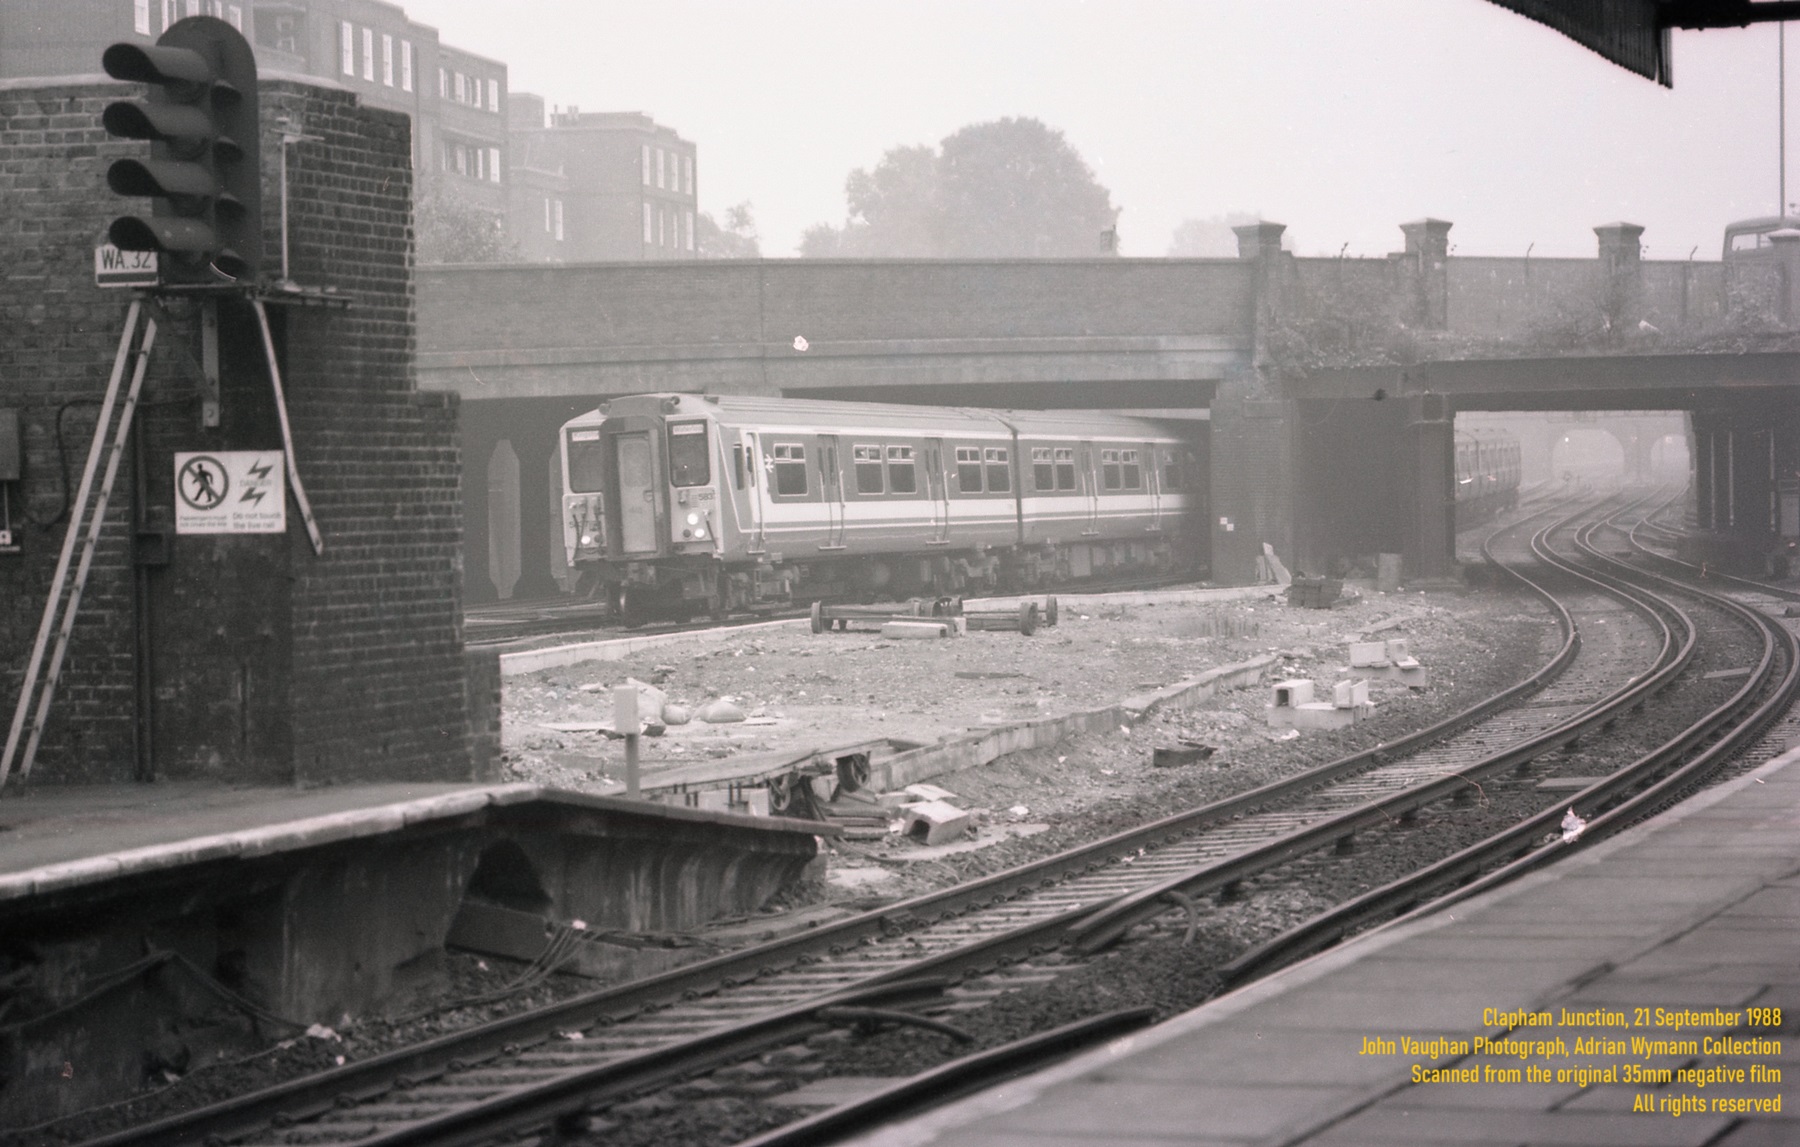
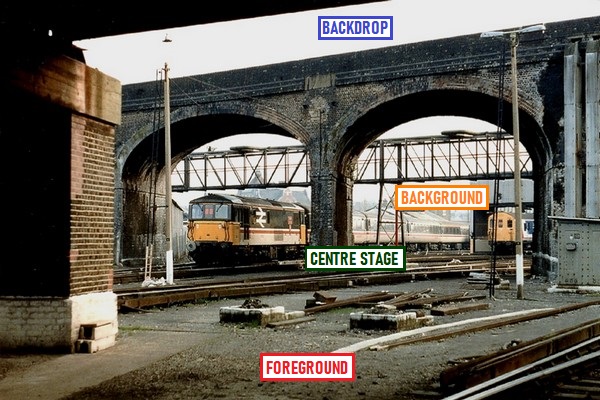
| In theory,
the world around us is, from our perspective, endless
since we can turn and move around in it and never reach
"the end". However, there are instances where
our movements and therefore also our perception are
blocked and therefore limited. Take, for example, this
view of Clapham Junction, Britain's busiest railway
station, situated a few miles South of the River Thames |
| |
 |
|
The
view of the scene - the "playing
space" - is limited both to
the right and to the left hand side by
architectural features. They block the
view of the photographer and prevent him
from having a clear and sweeping 180
degrees view of the scene. This
is exactly what stage designers do - they
make use of "flats",
drapes, "platforms" and other
means to delineate the areas that will be
used by the actors, and may also employ a
great deal of "masking" so that
actors or objects outside a clearly
marked area cannot be seen by the
audience.
There is also a distinct
segmentation of the depth of what the
onlooker is seeing: there is foreground,
a "centre stage", a background,
and a somewhat indistinct backdrop.
Differences in lighting enhance this
perception.
|
|
|
| |
| This is
exactly how most stage designs function in the theatrical
world, and most model railway layouts employ the same
techniques of structuring spatial depth, width and height
one way or another - simply because we all model in three
dimensions. |
| |
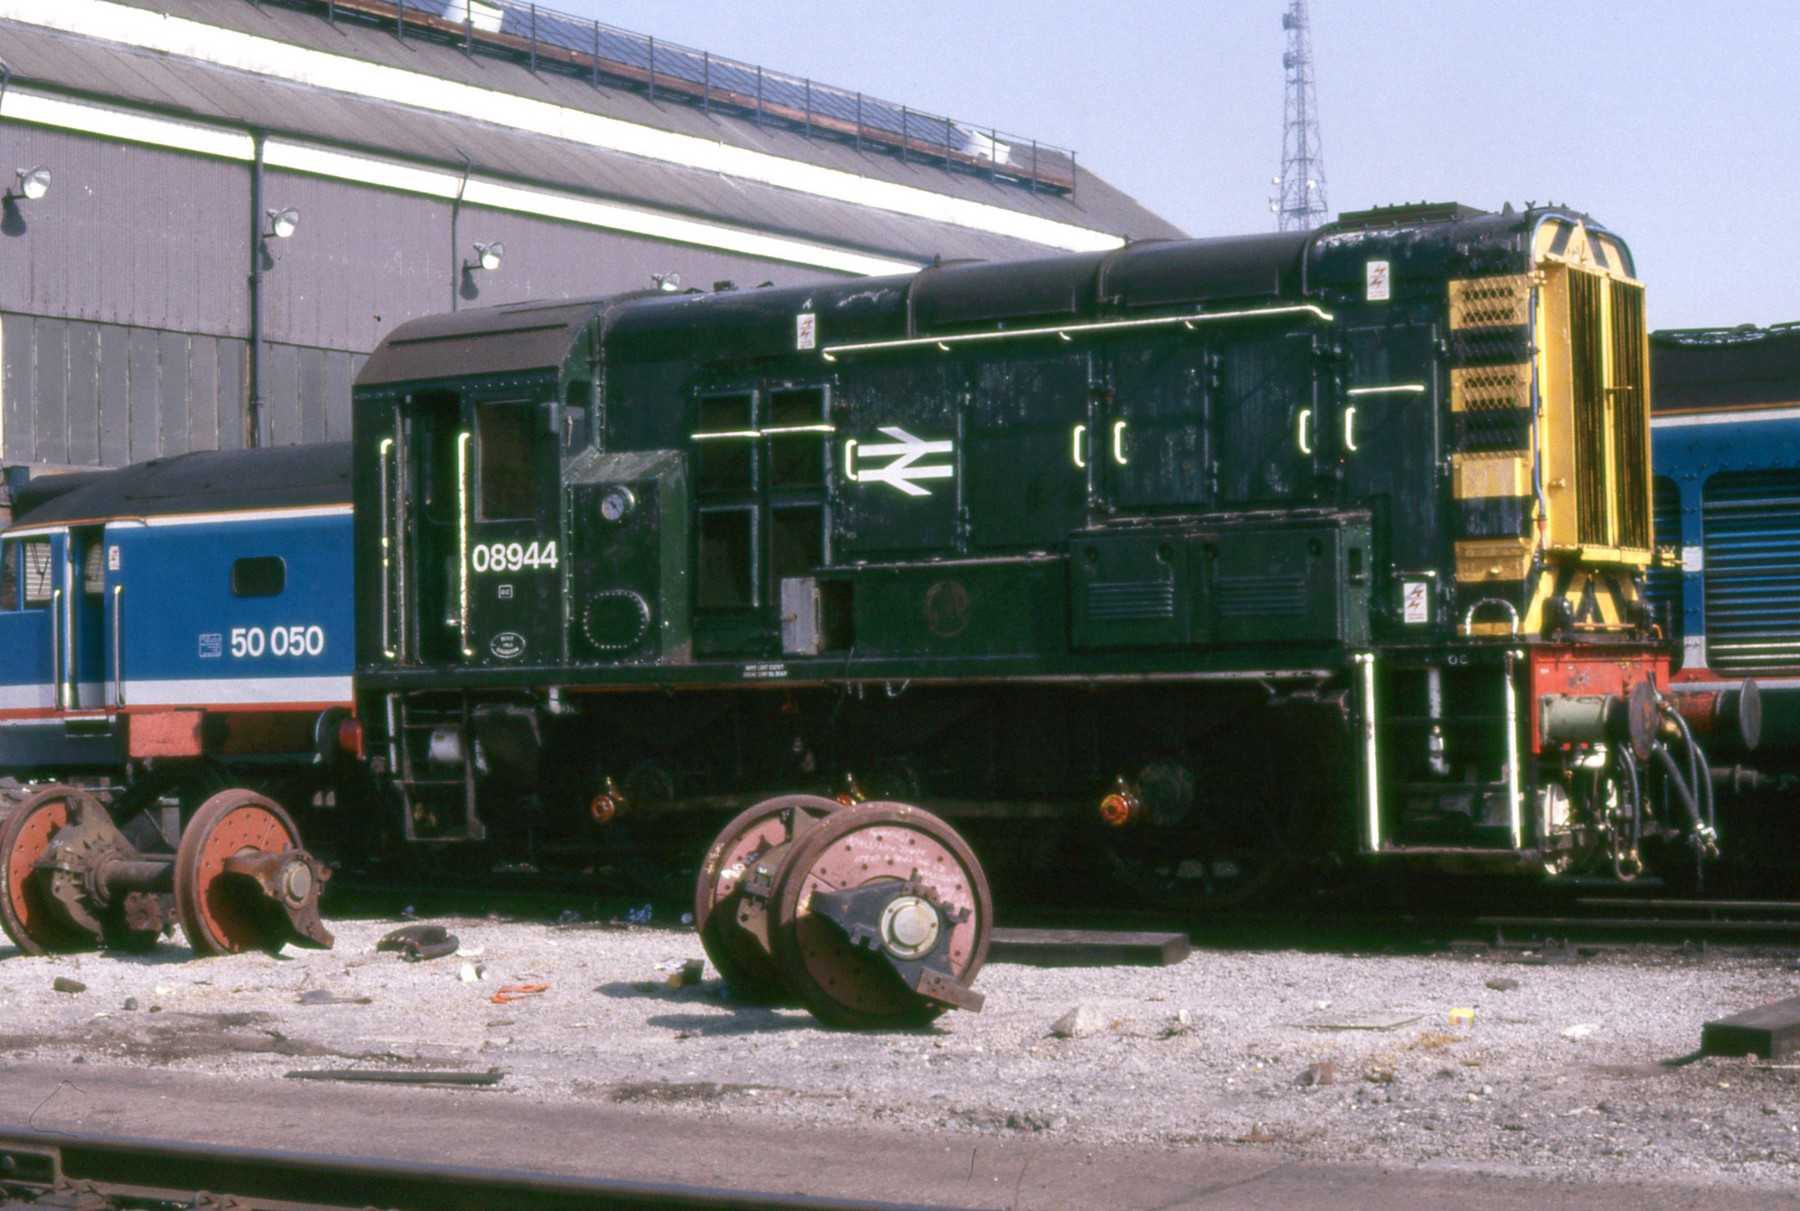
| However,
if applied systematically, the theatrical
stage concept can provide additional
effects for a layout, and one such stage effect which
can easily be replicated on a model
layout is to enhance the feeling of depth
by placing one or several items in the
foreground. As this example from the
prototype illustrates, it doesn't take
much: a pair of axles with wheels set out
in front of a track instantly sets the
Class 08 shunter back a little bit in
this scene at London's Old Oak Common
depot in the late 1980s.
The same effect can be
achieved on a layout without using up a
lot of actual space by using anything
from shrubbery to a car to any sorts of
appliances.
|
|
 |
|
|
| |
| |
|
SEPARATING
ONSTAGE
FROM OFFSTAGE
|
|
|
|
| |
| Also no stranger to railway
modellers is the concept of "onstage"
(usually the scenicked visible part of a layout) and
"offstage" (an imagined connection of
the layout to "the rest of the rail system"). |
| |
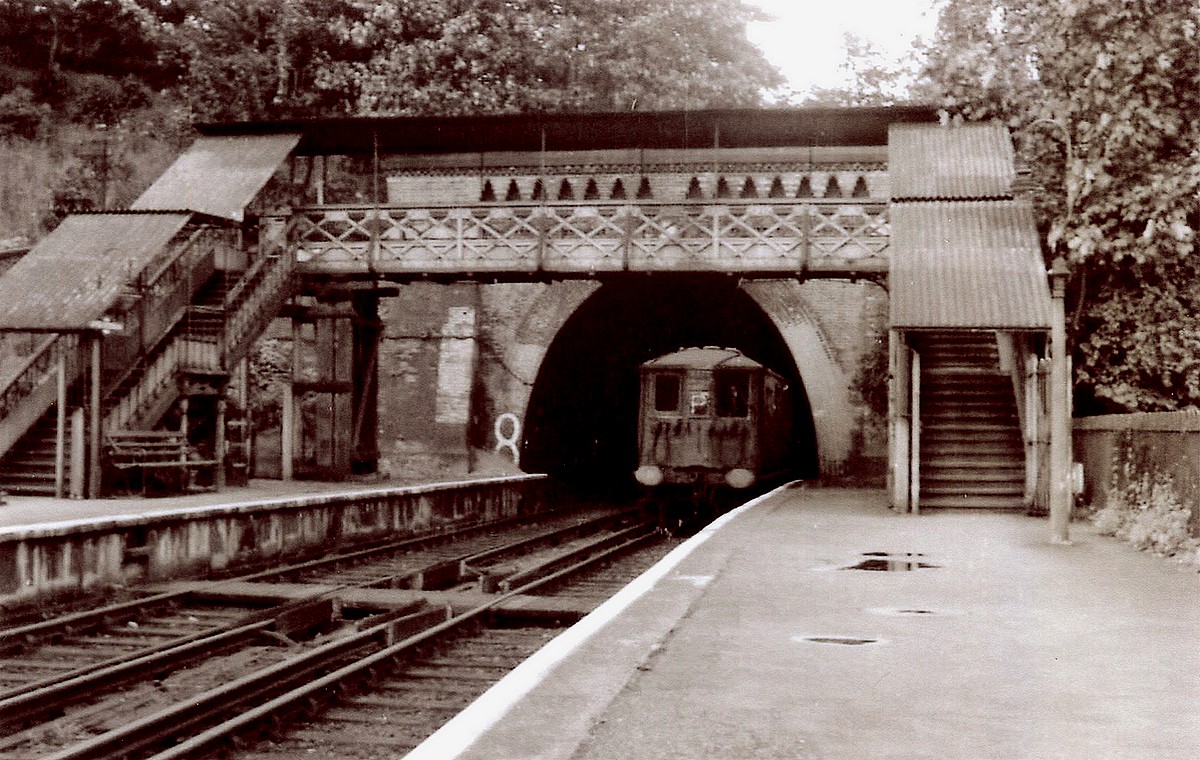
| The
latter may or may not exist as an actual
part of the layout (such as a fiddle
yard), but the transition from
"onstage" to
"offstage" is commonly hidden
by a "viewblock". Favourite
choices are tunnels and bridges, and an
actual (and from a modeller's perspective
very convenient) such example found on
the prototype is shown here. Upper
Sydenham station was the
penultimate station on the London Chatham &
Dover Railway's route to Crystal
Palace. Due to the topography of the
area, it was situated - somewhat unusual
for a suburban station - between two
tunnels set very closely together:
Crescent Wood Tunnel (seen here) and
Paxton Tunnel, only a quarter of a mile
down the line (the latter taking the
branchline south into Crystal Palace High
Level station).
|
|
 |
|
|
| |
| The line closed in 1954 due to
more convenient rail connections in the immediate
vicinity, but the fact that there was not only a tunnel
portal opening up right onto the station platforms but
also a footbridge crossing the tracks right in front of
it makes it a prime prototype example of a "hidden
transition": from the viewpoint of a passenger
waiting on the platform, trains would either appear
"onstage" from the tunnel or disappear
"offstage" through it. Again, this is
exactly how most stage designs function, although the
tunnel/bridge feature is a typical model railway layout
solution to hiding the transition from onstage to
offstage. In a theatre, many different means are used to
accomplish this, depending on the play and stage setting,
but they can all be described as "viewblocks":
the audience is supposed to see a logical and smooth
transition, not the actual exit off the stage, as this
would destroy some of the effect the stage layout is
trying to create.
From a theatrical layout design
perspective this means that you want to plan ahead to
incorporate appropriate view blockers into the design
before actually building the layout.
"Appropriate" is defined by the next major
function a theatrical stage has.
|
| |
| |
|
| |
| Defining the where and when for
the audience is such an important element for theatrical
plays that they have included this information in their
scripts (and later programme booklets) for centuries. |
| |
 |
|
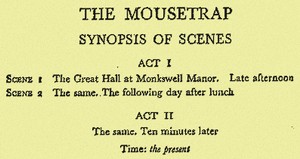
Take,
for example, one of the longest running
plays on record, Agatha Christie's famous
Mousetrap. The "synopsis of
scenes" not only spells out where
and when the events take place, but also
details their chronological order. Other plays will be not
quite as specific, but still attempt to
clearly define the place and time
of events depicted on stage. Few
plays, books or movies fail to do so (and
if they do, it is often a deliberate
move) because it creates coherence and
therefore a "believable illusion of
reality" - something which would be
immediately upset if a group of cavemen
were to enter the stage during the Mousetrap.
|
| |
|
|
| It doesn't
mean that all details need to be perfectly spot on (not
everybody watching a movie set in the late 1960s will
notice a certain car being an early 1970s model) but
glaring anachronisms (such as a 1970s inspector whipping
out a smartphone) will be noticed. And when an audience
is struck by something as being "off", the
illusion of reality is at least momentarily destroyed.
Unless intentional, it is definitely something theatrical
productions put a lot of effort into avoiding (e.g. by
paying attention to correct props and clothing). |
| |
| This is why few railway
modellers will want to replicate the
scene depicted on the cover of the 2020
Hornby catalogue. The amount of
coherence deemed necessary or desirable
for a specific model railway layout will
always be a matter of choice and
ultimately commitment. From a theatrical
layout design perspective, the point to
take away here simply is that defining
place and time and ensuring that the
stage settings reflect these is essential
to creating something that feels
"right".
It is important to
note that coherence doesn't equal a
static and inflexible approach - even the
very detailed settings for the Mousetrap
contain a shift in time (one day only,
but some plays cover several years or
even decades) and a very general temporal
setting of "the present" (which
could also be "the 1980s" or
"steam to diesel transition
period"). A more cohesive approach
to designing, detailing and running a
layout in no way precludes the liberty of
doing things according to personal
preferences, and "modeller's
licence" can easily explain steam
and diesel locomotives running side by
side if assuming a "heritage
railway" setting. If this is done
coherently, it will also be convincing.
Creating
cohesiveness the way a theatrical
production does can actually also be a
helpful tool if you tthink about what can
be done with the right props.
|
|
 |
|
|
| |
| Imagine a layout featuring a
passenger station set within the sprawling network of
railway lines criss-crossing England's South East. How
can one single layout be set up to coherently represent
the 1960s, 1970s, 1980s and even early 1990s? |
| |
 |
|
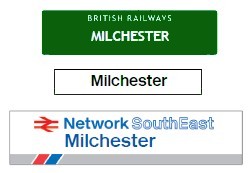
In setting the stage,
some elements can remain unchanged such
as the station building, as many of them
weren't modernized in real life during
those periods. As for props, changing
certain items out depending on which
period is to be represented will go a
long way in creating cohesiveness. In our
case, station signs (which changed
significantly between the 1960s and the
1990s) will have a major impact for
audiences in the know. The actors in this
example can remain the same (third rail
Electric Multiple Units) and will simply
require to sport the correct costumes
(i.e. livery) for the period displayed. Planning ahead for
this and making some prominent props
(such as vehicules and platform details)
exchangeable will actually provide the
layout in question with a simple way of
providing a very believable swap of
period markers.
|
| |
|
|
| This is just one example of how theatrical layout design can
provide additional interest in a layout by using props
and settings accordingly. |
| |
| |
|
| |
| A cohesive overall
"feel" for any stage production can further be
enhanced by creating a clear sense of theme and mood. |
| |
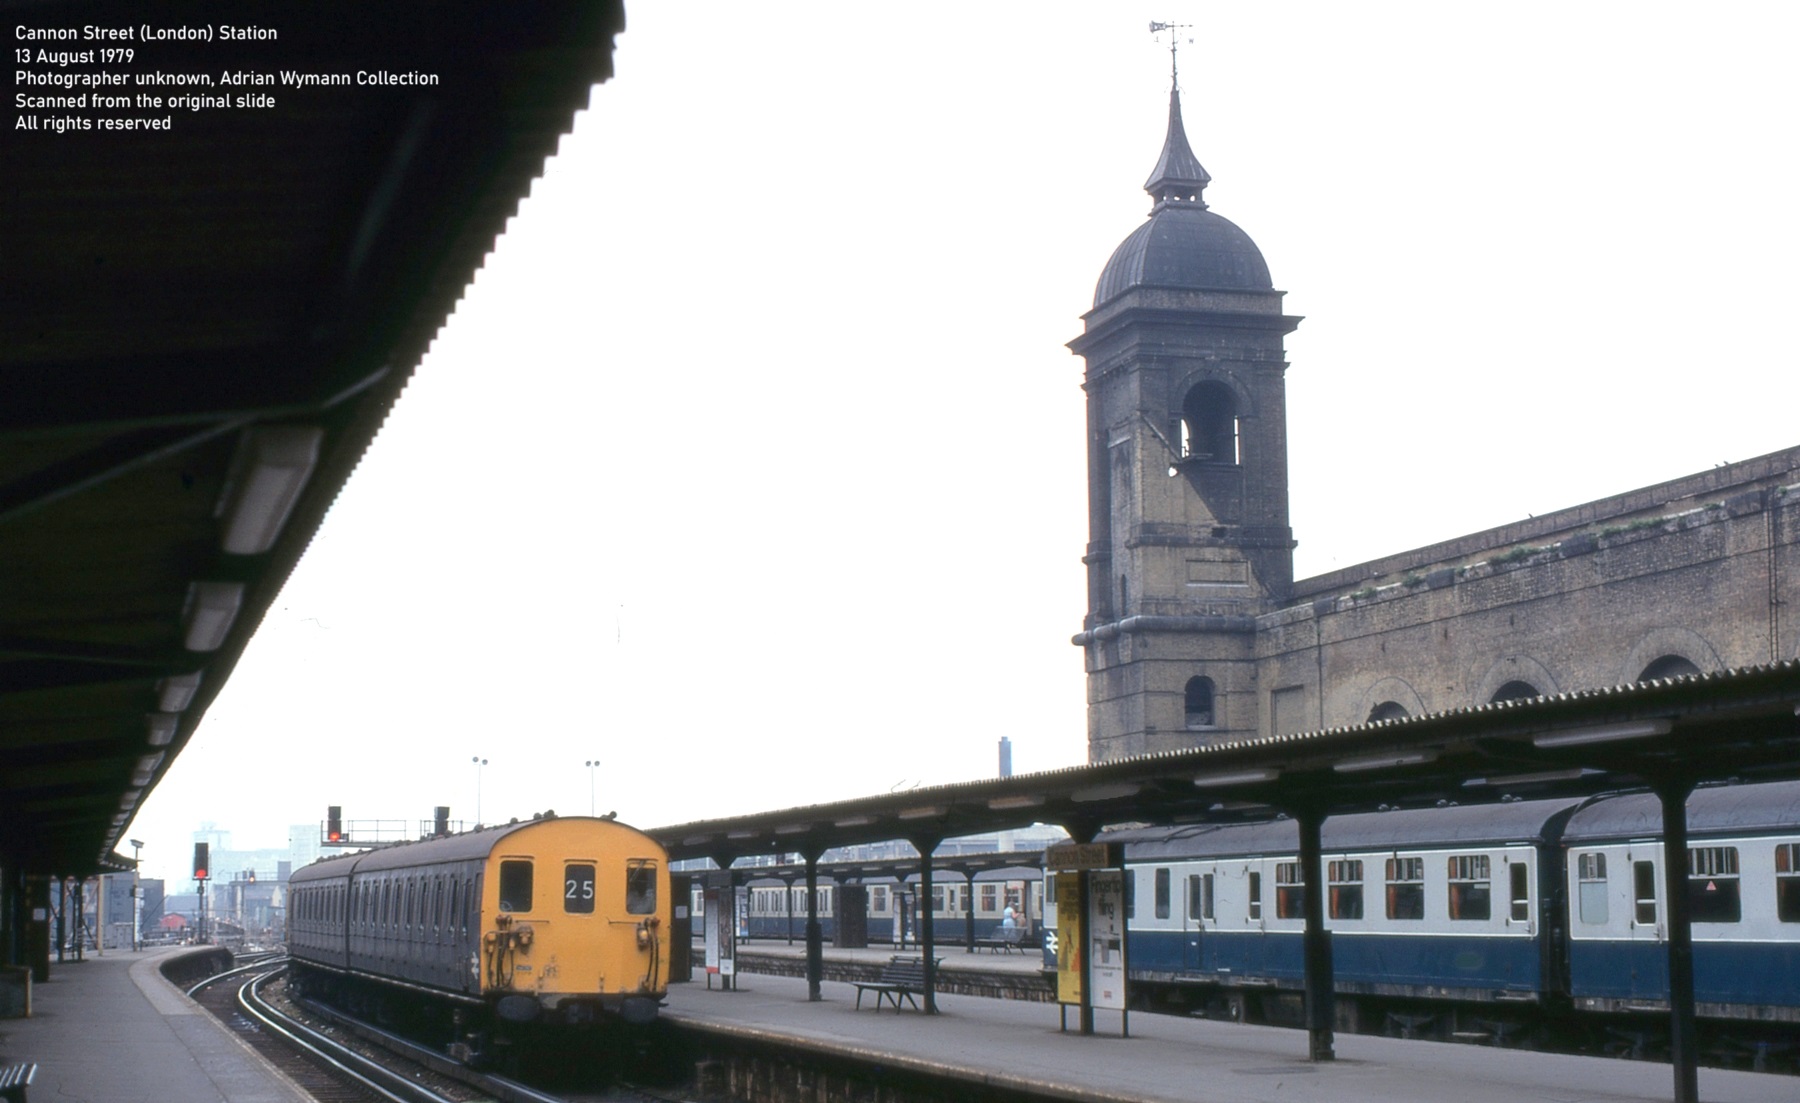
| Taking
the railway scene shown here it will be
evident to anyone that the setting is an
urban one (as opposed to e.g. a rural
backwater). The location is indeed a
London terminus (Cannon Street), and the
trains in view suggest a theme of
"commuter trains". Some details visible
(such as the electrified third rail)
enhance this perception even more, even
though they may be lost on a majority of
people looking at this snapshot - the
important thing is that, again, it is all
coherent and "right" to support
a theme of urban
passenger trains.
|
|
 |
|
|
| |
| As far as mood
is concerned, this view of the platforms at Cannon Street
indicates a somewhat slower moment (as opposed to the
rush hour) during the day (as opposed to nighttime), and
the overall impression is of a certain degree of order
and cleanliness (the year is 1979, and although there was
plenty of littering (not as prominently visible here)
graffiti was still rare). It's a fairly proper looking
station. |
| |
 |
|
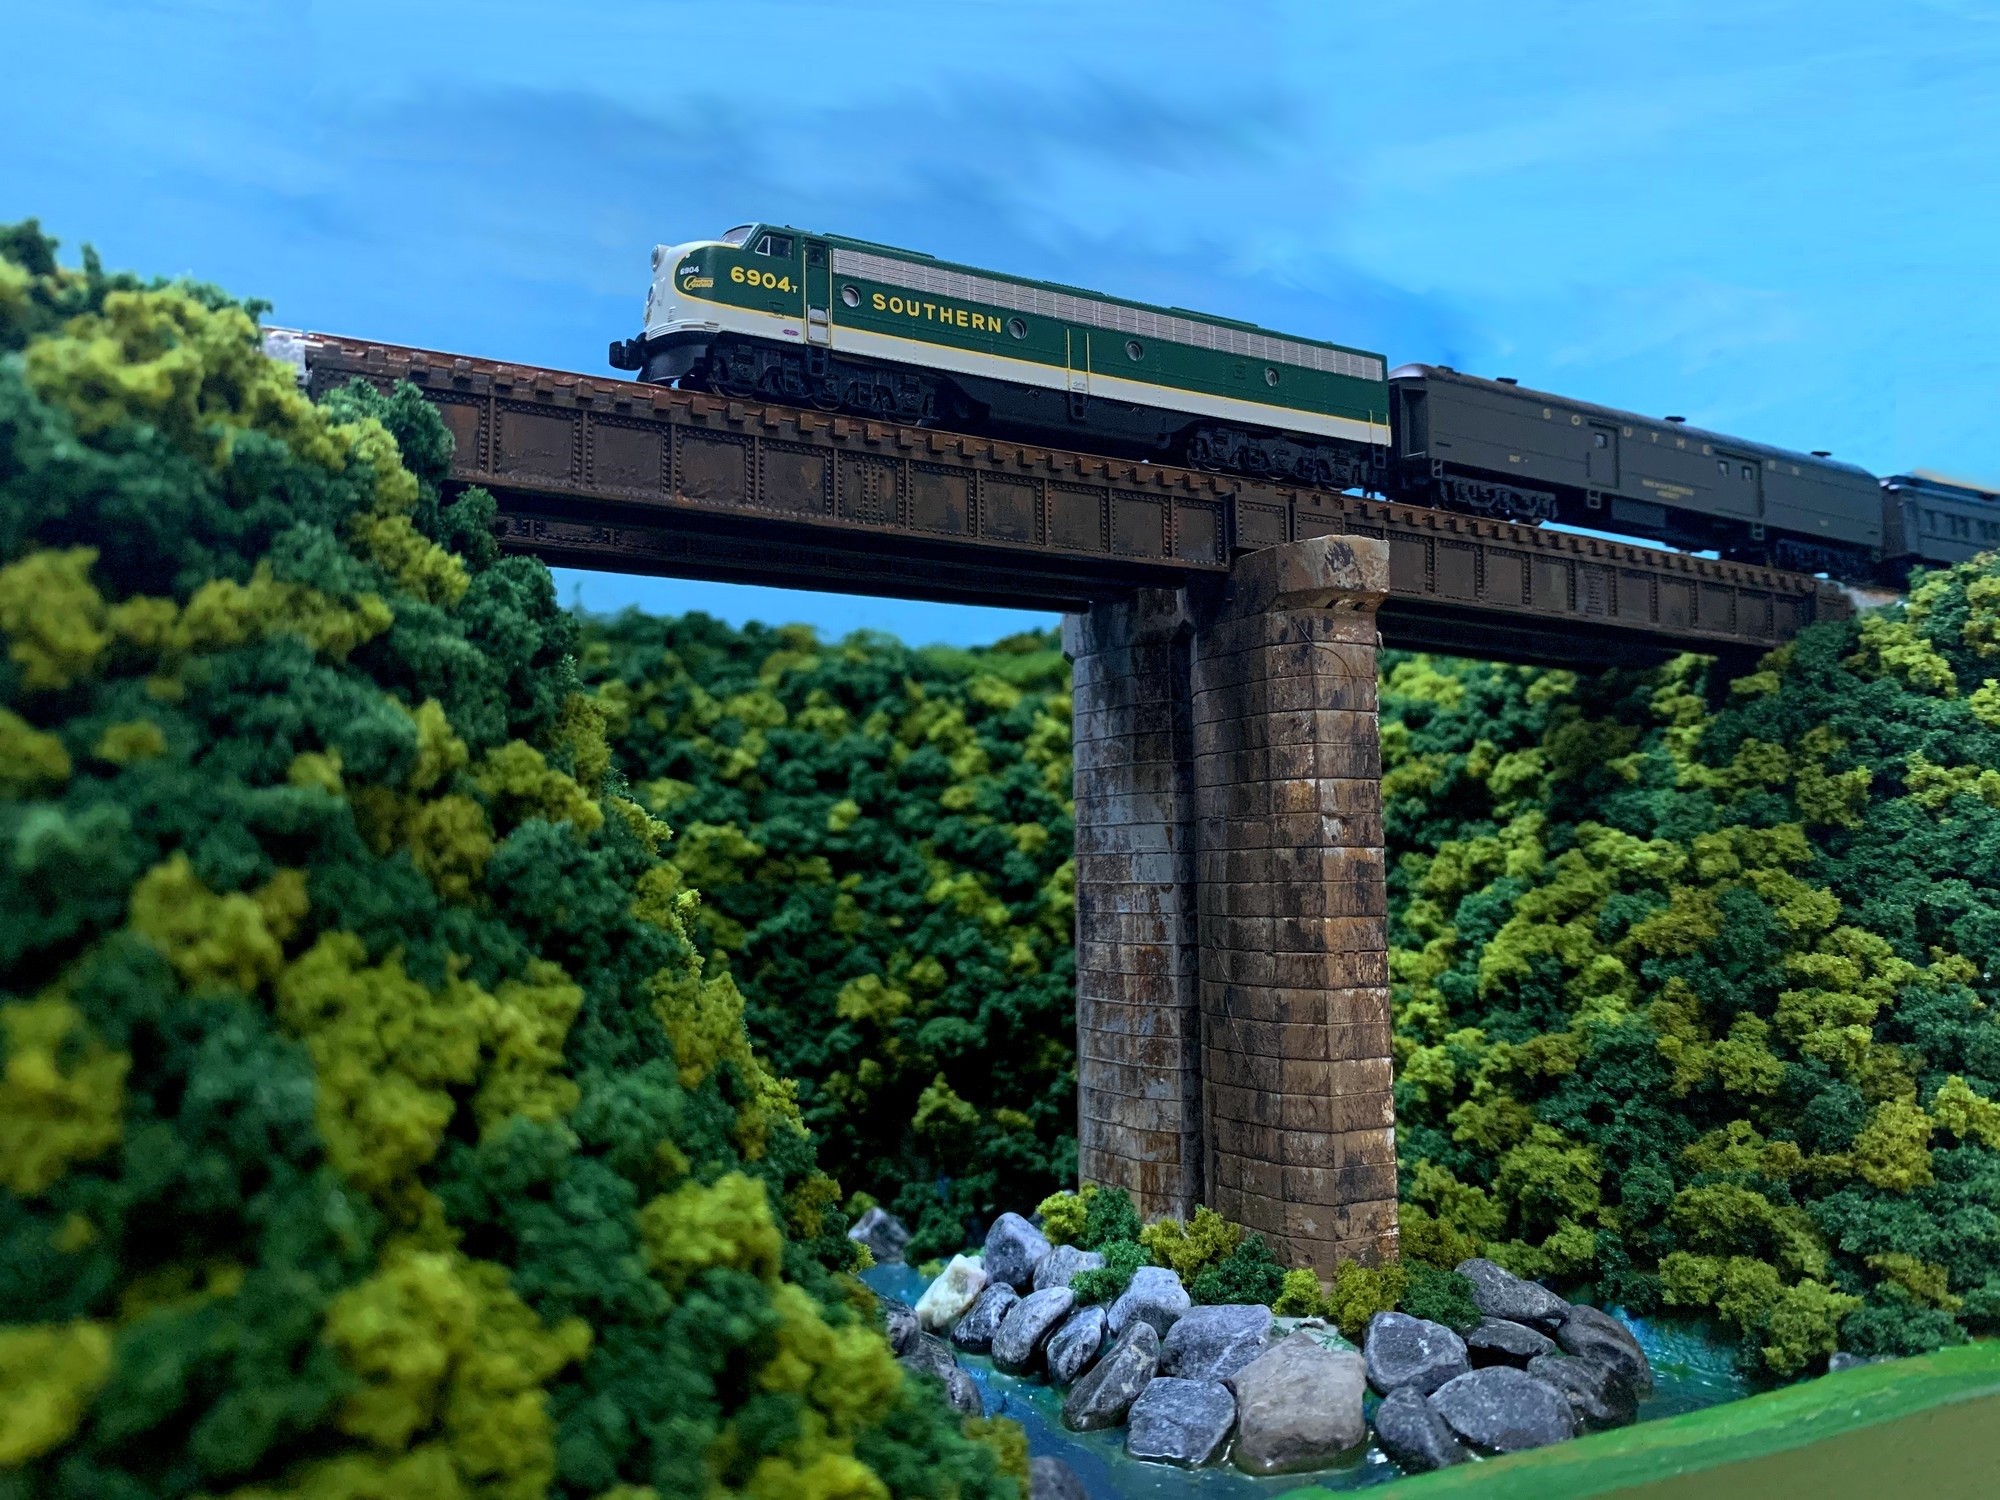
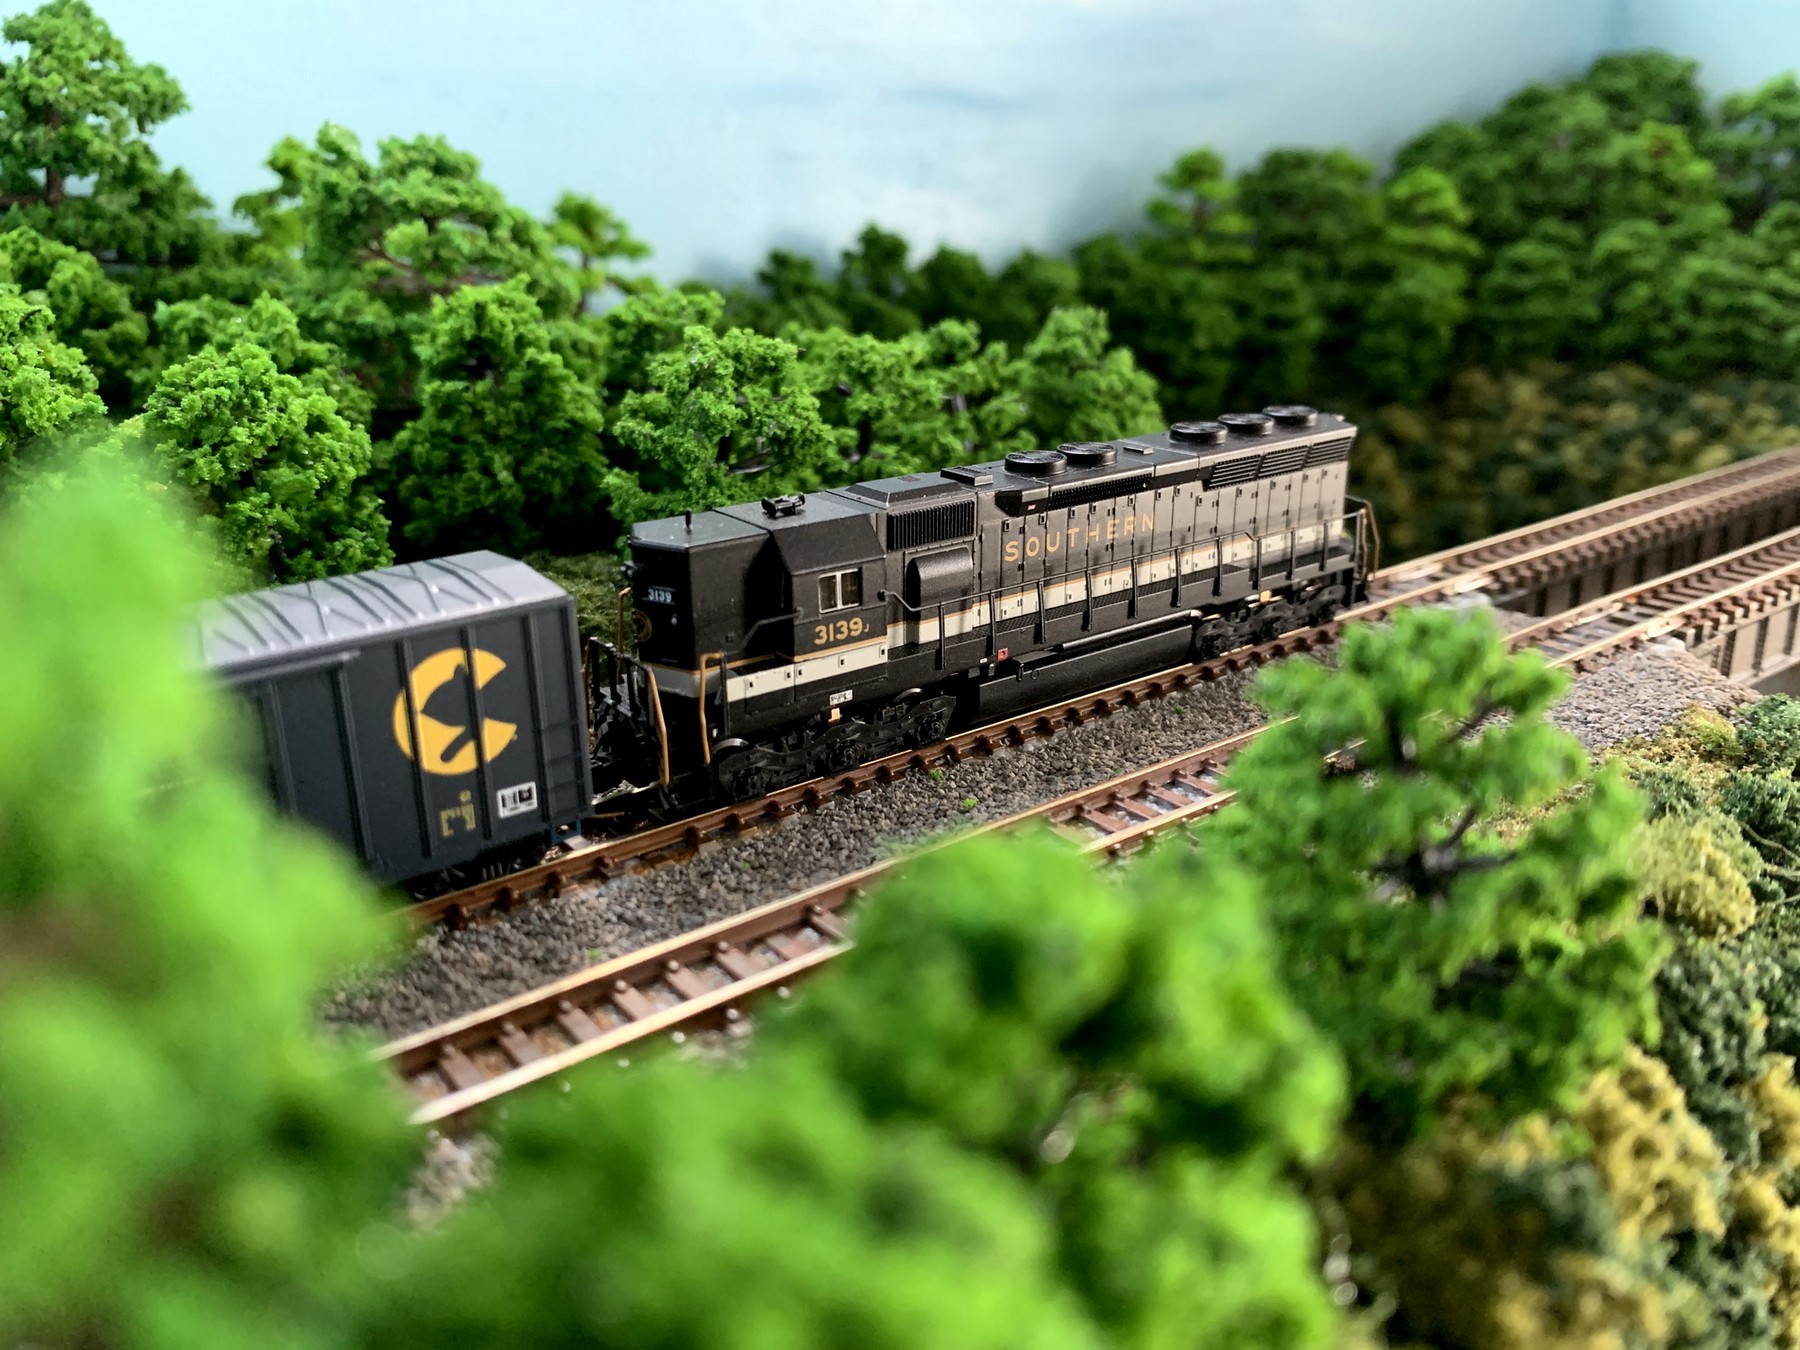
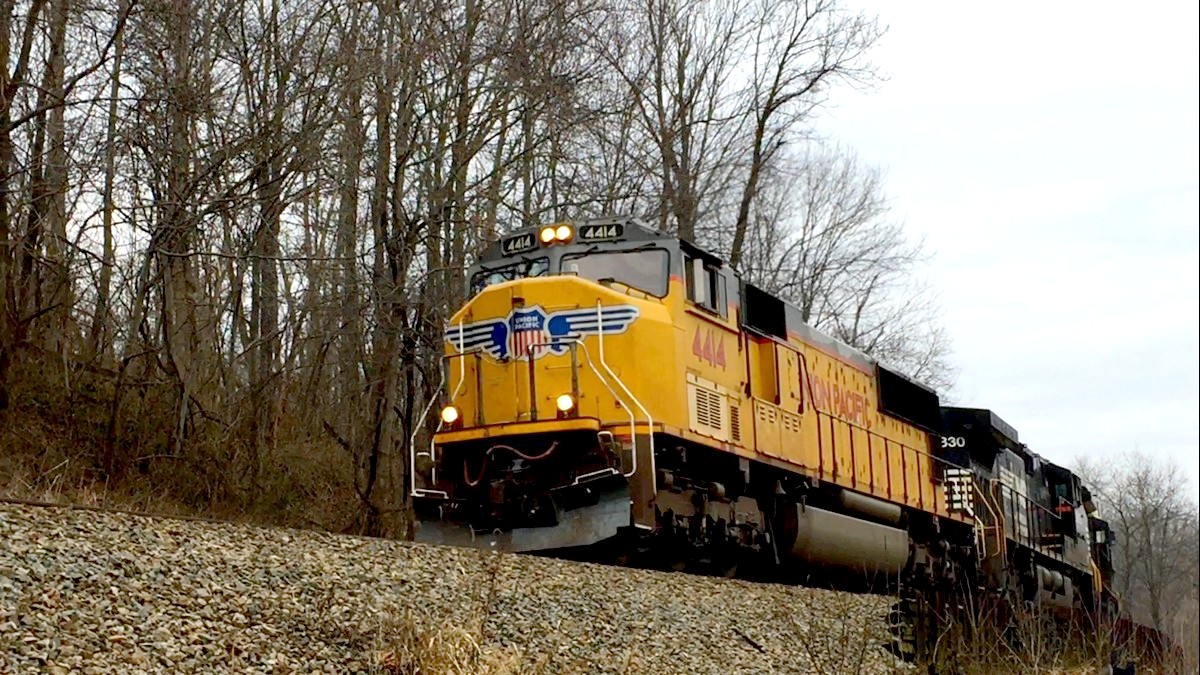
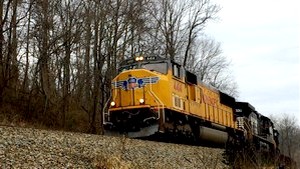
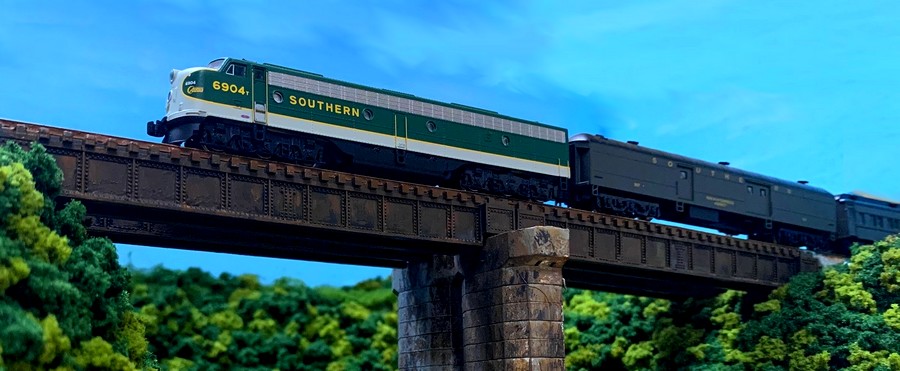
Themes
and moods don't necessarily need to be
very clear cut and can leave quite a bit
of room for interpretation without
becoming ineffective. In the scene shown
here, the only "messages"
conveyed are that the location is a rural
spot somewhere in the US (inspite of the
Union Pacific locomotive, the place is
Markham, Virginia), the season must be
autumn or winter, and we're looking at a
freight train. In
comparison to the Cannon Street scene
there a fewer clues as to theme and mood,
but they still project a coherent overall
impression. In exactly the same way, not
all model railway layouts will need
"high definition" themes and
moods, but it is a useful concept to bear
in mind, especially if the purpose of a
layout is to capture a certain era, area
and/or type of operation.
|
| |
|
|
| |
|
USING
STAGE TRICKS FOR A MODEL RAILWAY
LAYOUT
|
|
|
|
|
| |
| A major topic for
Frank Ellison was the use of "stage tricks" for
small layouts. They are all essential tools for
theatrical productions, and it is a credit to Ellison's
influential writing in the model railroad press in the
1950s that most if not all of these "tricks"
have become common modeller's knowledge, even though the
name Frank Ellison will most likely be unknown to most. |
| |
| |
SELECTIVE COMPRESSION
|
| |
| In essence, there is no reduced scale modelling
without selective compression. Even O scale models -
which are considered "big" in most railway
modelling quarters - simply can't replicate every element
of the real thing when shrunk by a 1:43 ratio, and that
physical necessity for compromise grows as the models
shrink even further. In having to thus compress a model,
manufacturers will do so selectively, trying to retain
the salient features and characteristics. The same
necessity applies to layouts. Even the smallest branch
line locations are far too spacious to be modelled
without any compression at all, a point well illustrated
by Angela Halliday and Tony Caine's
Hayling Island, a dimensionally accurate 4mm
finescale model of a small branch line terminus in
South-East England in the 1950. This layout required a length of 20 ft (6 m)
and a depth of 7 ft (2,10 m) in order to model what is
essentially a fairly small affair as railway locations
go.
There's
simply no way around selective compression, but the
theatrical layout design perspective offers a few
additional takes on the subject. On a stage,
selective compression is very often achieved by spot
lighting, and while not
really practical for modellers, the point to take away
from this is that clever accentuation on a layout, e.g.
through foreground or background placement of certain
props (think buildings and scenery) can direct (and
potentially "fool") the viewer's perception of
what he is seeing. Selective compression also applies to
the actors, i.e. the trains. If platforms and sidings
need length shaved off, then shortening trains will
render the scene visibly more realistic. This can either
be achieved by selecting a period of time when shorter
rolling stock was the norm, or by shortening train
formations. It's always a compromise, but it can be made
to look coherent; in fact in some cases, manufacturers
already make that choice for the modeller. One of many
examples is Bachmann's OO model of an EPB electric
multiple unit, which is only offered as a two car model
(2EPB) but not as a four car unit (4EPB). Both are
prototypical, but the shorter unit obviously affords the
modeller with more flexibility and can be considered a
form of "ready to run" selective compression.

Selective compression is also
applied to time, often without giving this much thought,
since few modellers will want to sit around for two hours
in order to run the next train in an "uncompressed
time frame". The solution is to either run a
sequence of train moves (possibly even based on a
timetable) to a "fast clock" (where one actual
minute may represent e.g. 15 minutes) or simply start the
next move once the previous one has been completed.
|
| |
| |
FORCED PERSPECTIVE
|
| |
| Forced perspective is a technique
which essentially employs an optical illusion in order to
make an object appear farther away, closer, larger or
smaller than it actually is. It works by manipulating our
visual perception and tricking our brain into making
false assumptions on how objects correlate in terms of
size and distance. |
| |
| The
technique has its origins in
architecture, with one of the most famous
examples being a gallery at the
Palazzo Spada in Rome. Designed in 1632
by Francesco Borromini, it gives the
illusion of being around four times its
actual length by cutting down the size of
the pillars at the back and moving them
inwards at the same time. The effect
works because this is how we know
perspective to usually work, but it also
requires the viewer to be fairly static
(in this case cleverly assured by the
foreground pillars) as movement often
destroys the effect - if someone were to
walk into the Palazzo Spada gallery the
trick would be revealed almost
immediately. This is also why the forced
perspectives used in the Lord of the
Rings movies required carefully
calculated and synchronized camera and
set movements. Forced
perspective can work on a layout, but
only if it can be "controlled"
by a restricted viewpoint - which is why
attempts at, for example, adding depth to
an actually shallow background by using
forced perspective, often don't really
work that well. Even the use of N scale
items (including a running train) in the
background of an HO scale layout often
doesn't hold up for more than a few
seconds as full control of the technique
would require it to be viewed at
eye-level only.
|
|
 |
|
|
| |
| Frank Ellison was aware of the
fact that while forced perspective could be made to work
on a theatrical stage, it was not an easily transferable
technique to layout design, quite unlike low relief and
viewblocks. |
| |
| |
LOW RELIEF
|
| |
| The concept of low
"relief" (from Latin relevare,
"to raise up") originates with the sculptural
technique of leaving items attached to a solid background
rather than having them fully modelled and free-standing.
|
| |
 |
|
Stage designers for both
the theatre and then movie productions
took up the idea as it allowed them to
only have to show a part of e.g. a building,
which saved both space and money. The
lots of movie studios everywhere quickly
accumulated an abundance of such
"fake buildings", as they were
highly effective in early productions
which featured only very reduced camera
movements. The technique
can at times even allow for ultra shallow
"fronts", as long as the camera
doesn't allow the viewer to "peek
behind the scenes" - which is why
"flats" are also a very common
technique in stage productions.
|
| |
|
|
| The benefit of the space saving
nature of "low relief" buildings has made them
a ubiquitous feature on model railway layouts - and
possibly the most common theatrical layout design feature
not even recognised as such. |
| |
|
| |
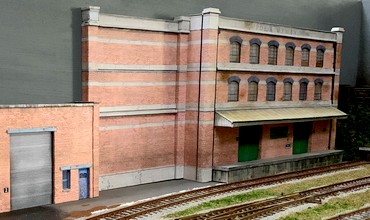 |
|
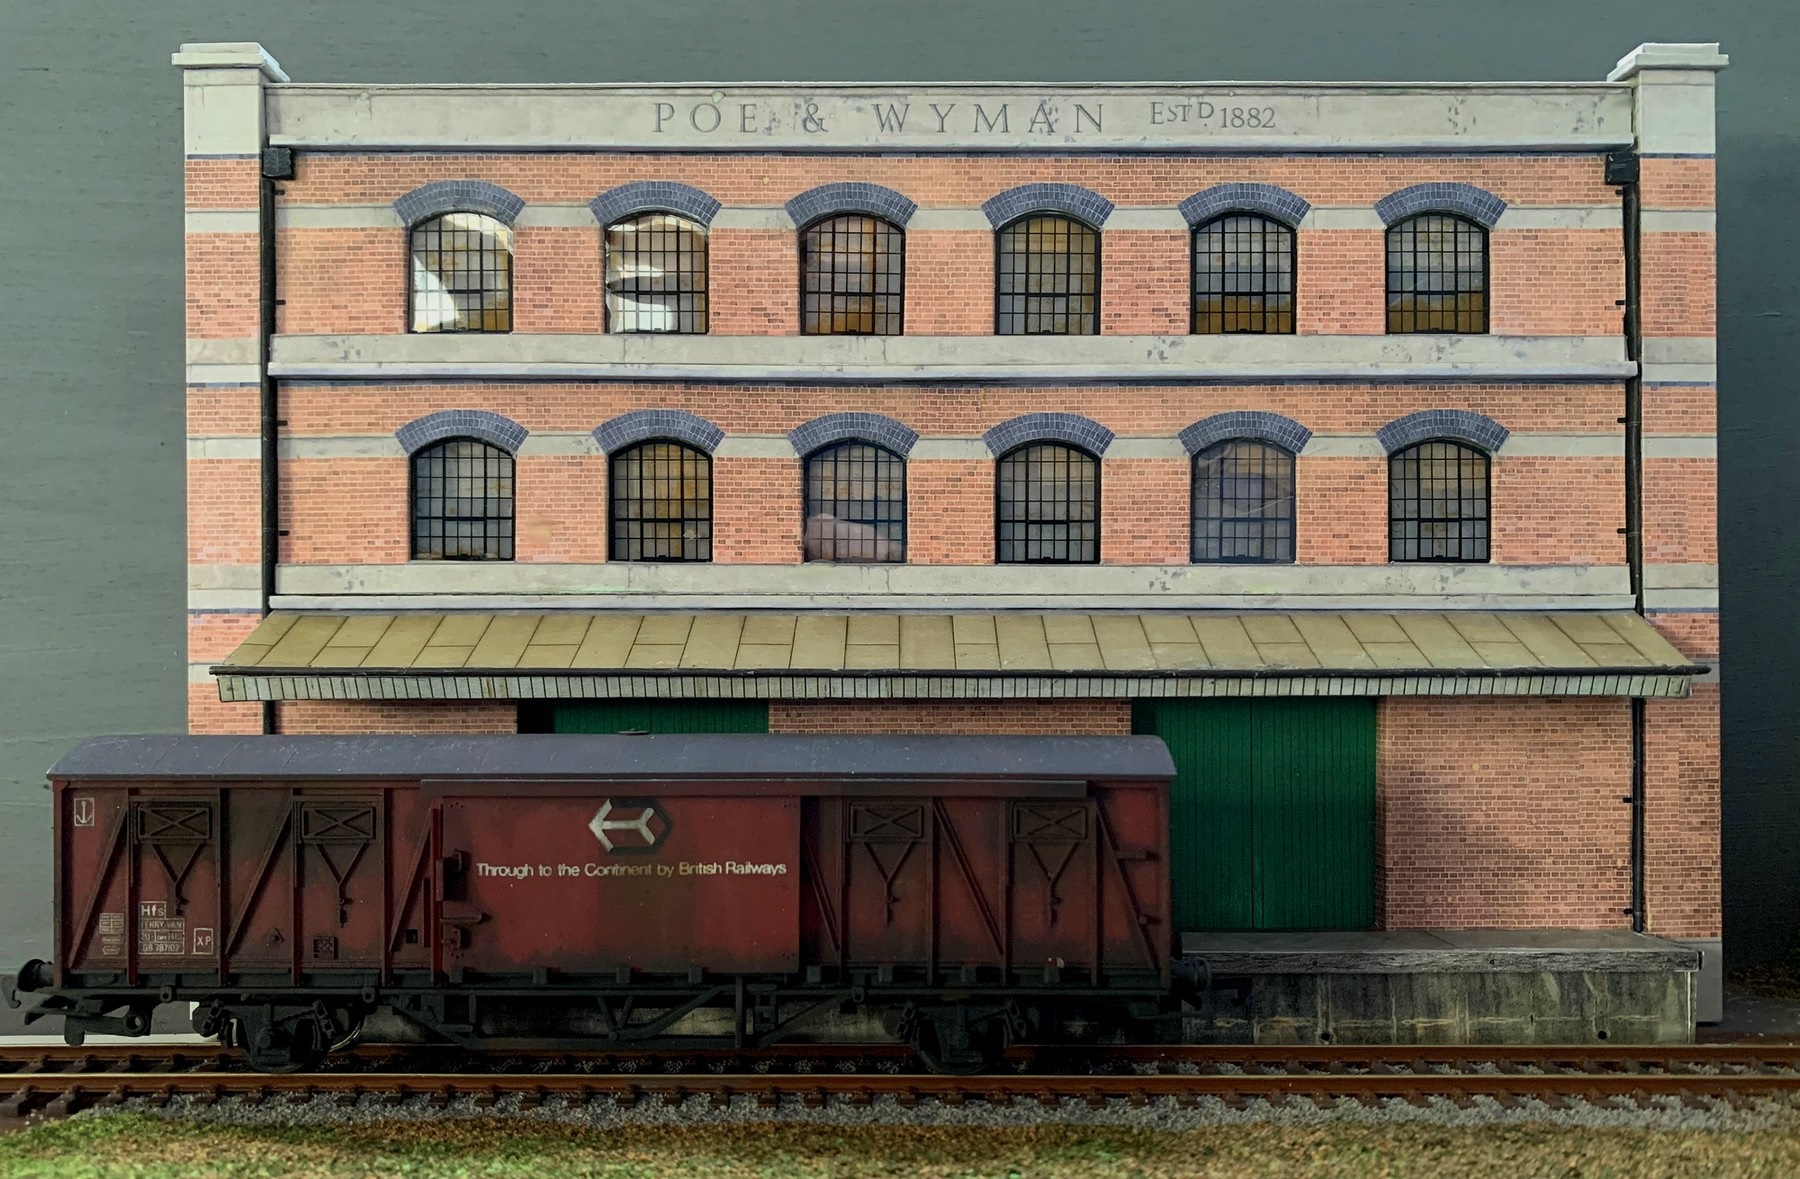
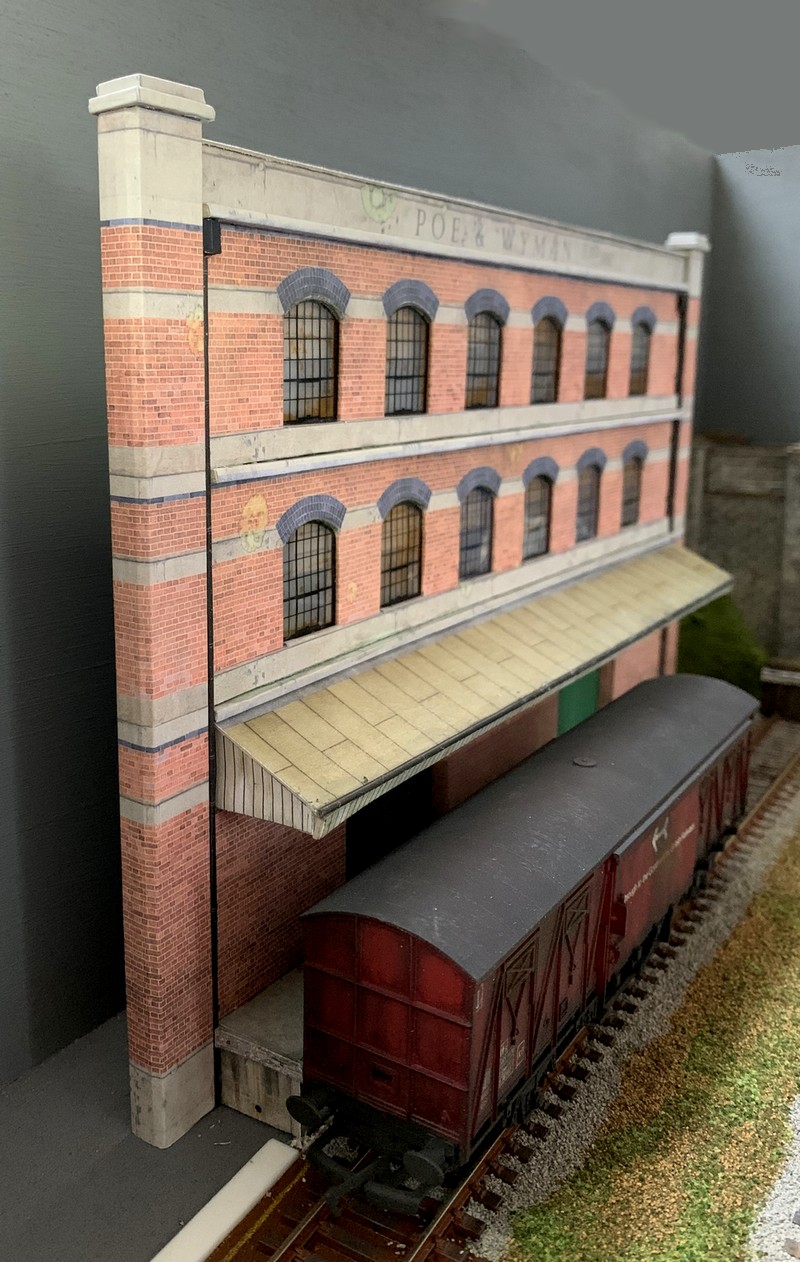
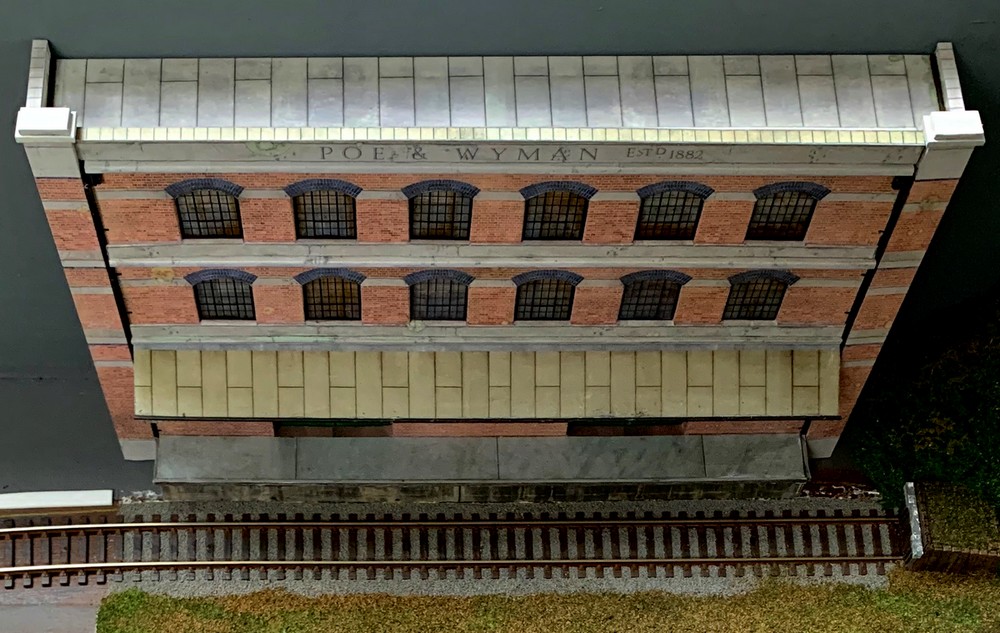
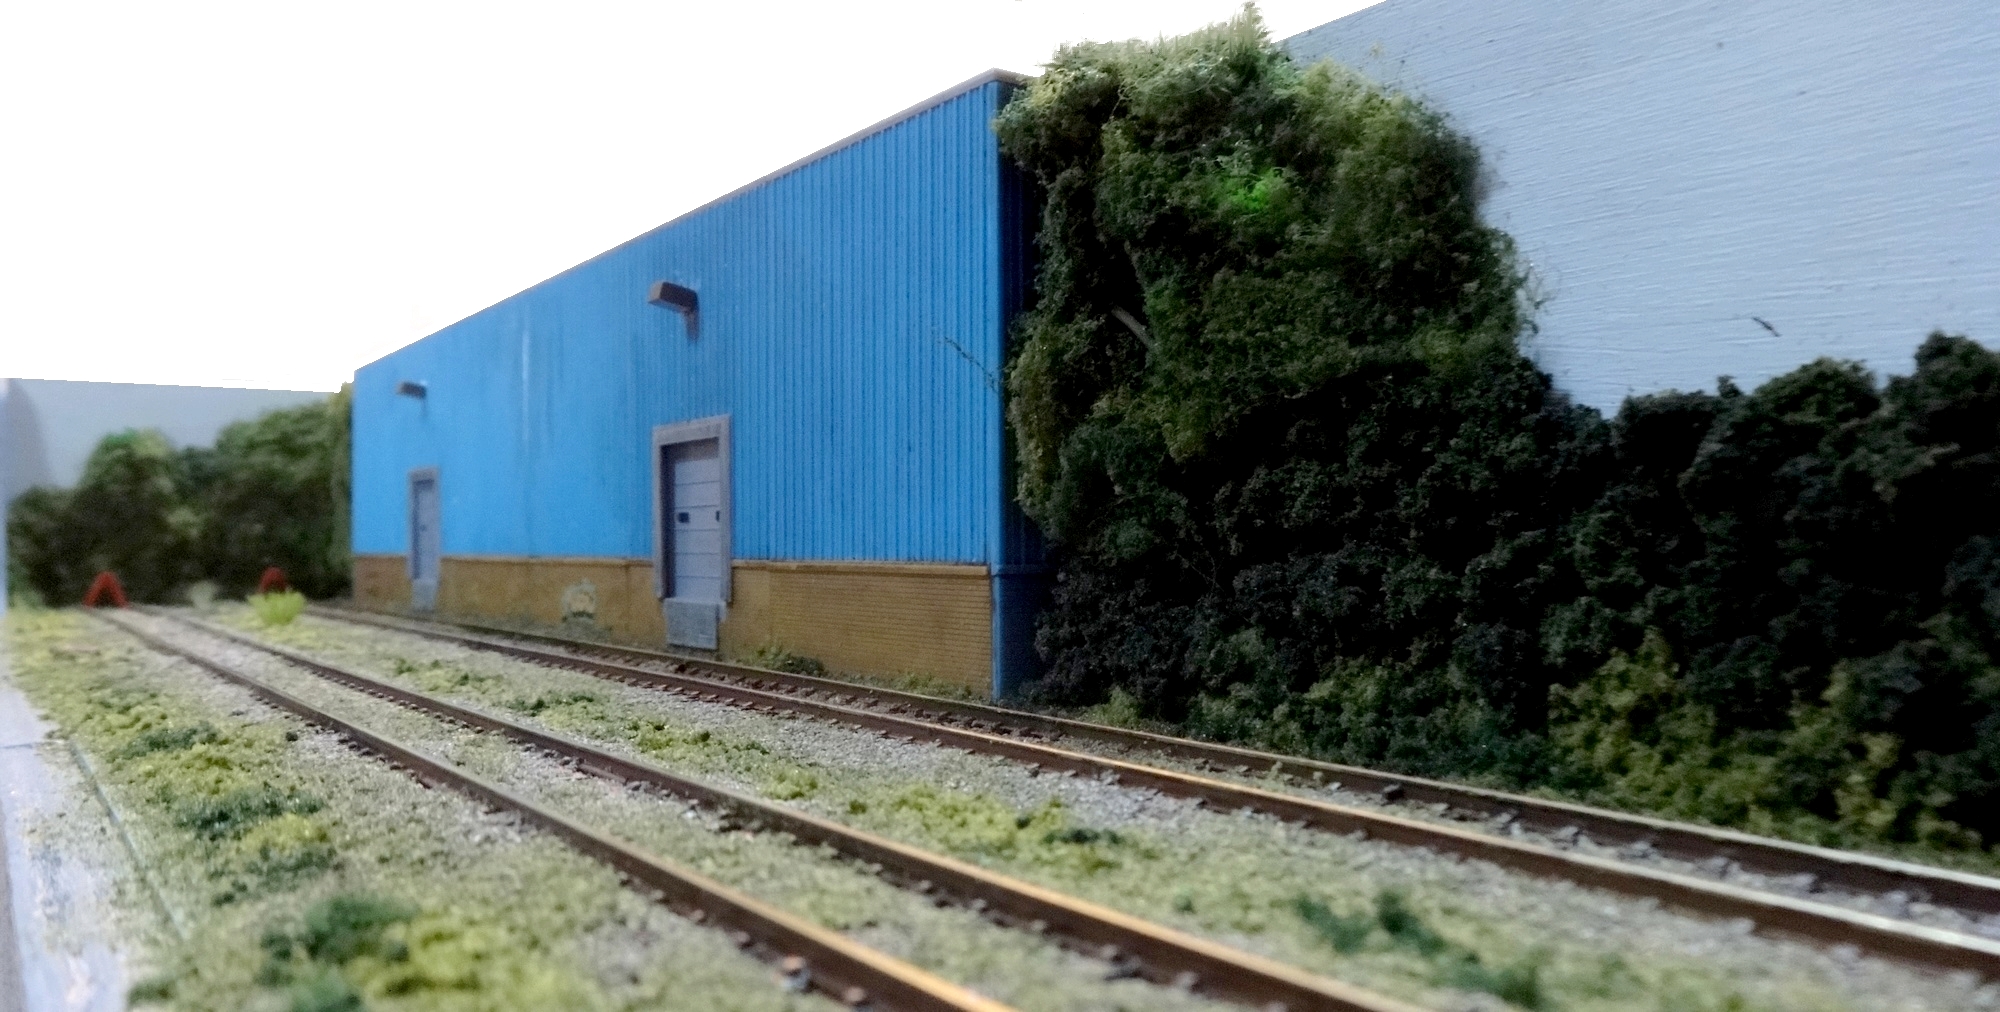
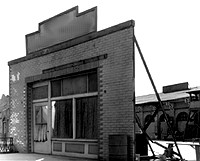
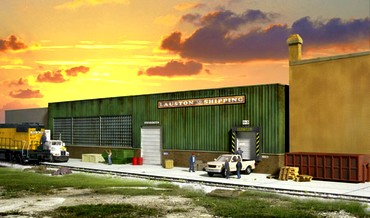
The top left picture shows the
"silent movie effect"- viewed from the
front at a right angle, there is no way of
telling that the warehouse building (a
Scalescenes OO card kit) is actually only a very
flat front. However, moving
the viewpoint sideways just a bit immediately
reveals the flatness of the building (top centre
image), so in order for this to work the
warehouse needs a bit more substance (the kit is
designed as a very low relief, so the roof and
side walls were kit-bashed).
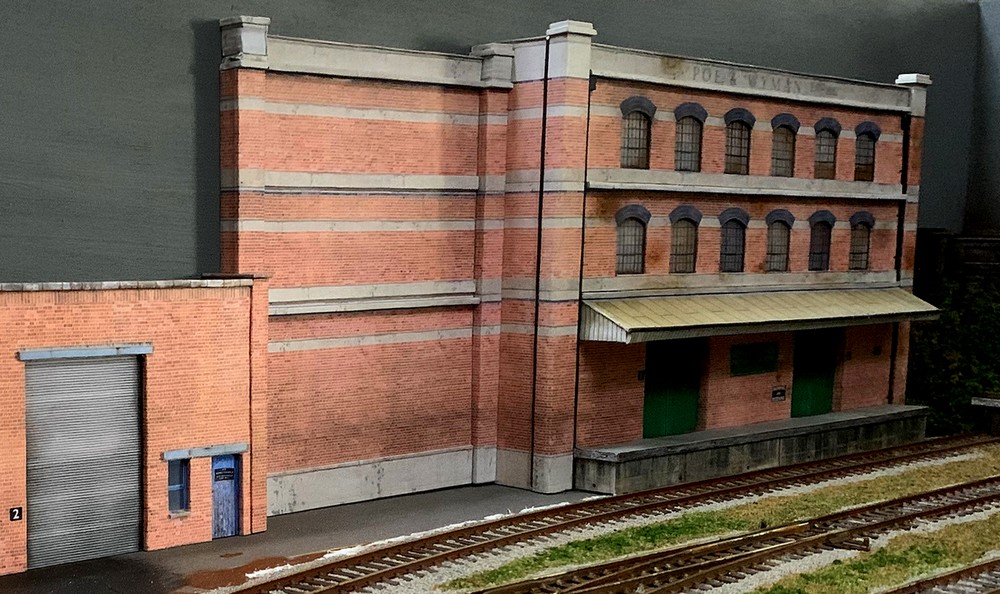
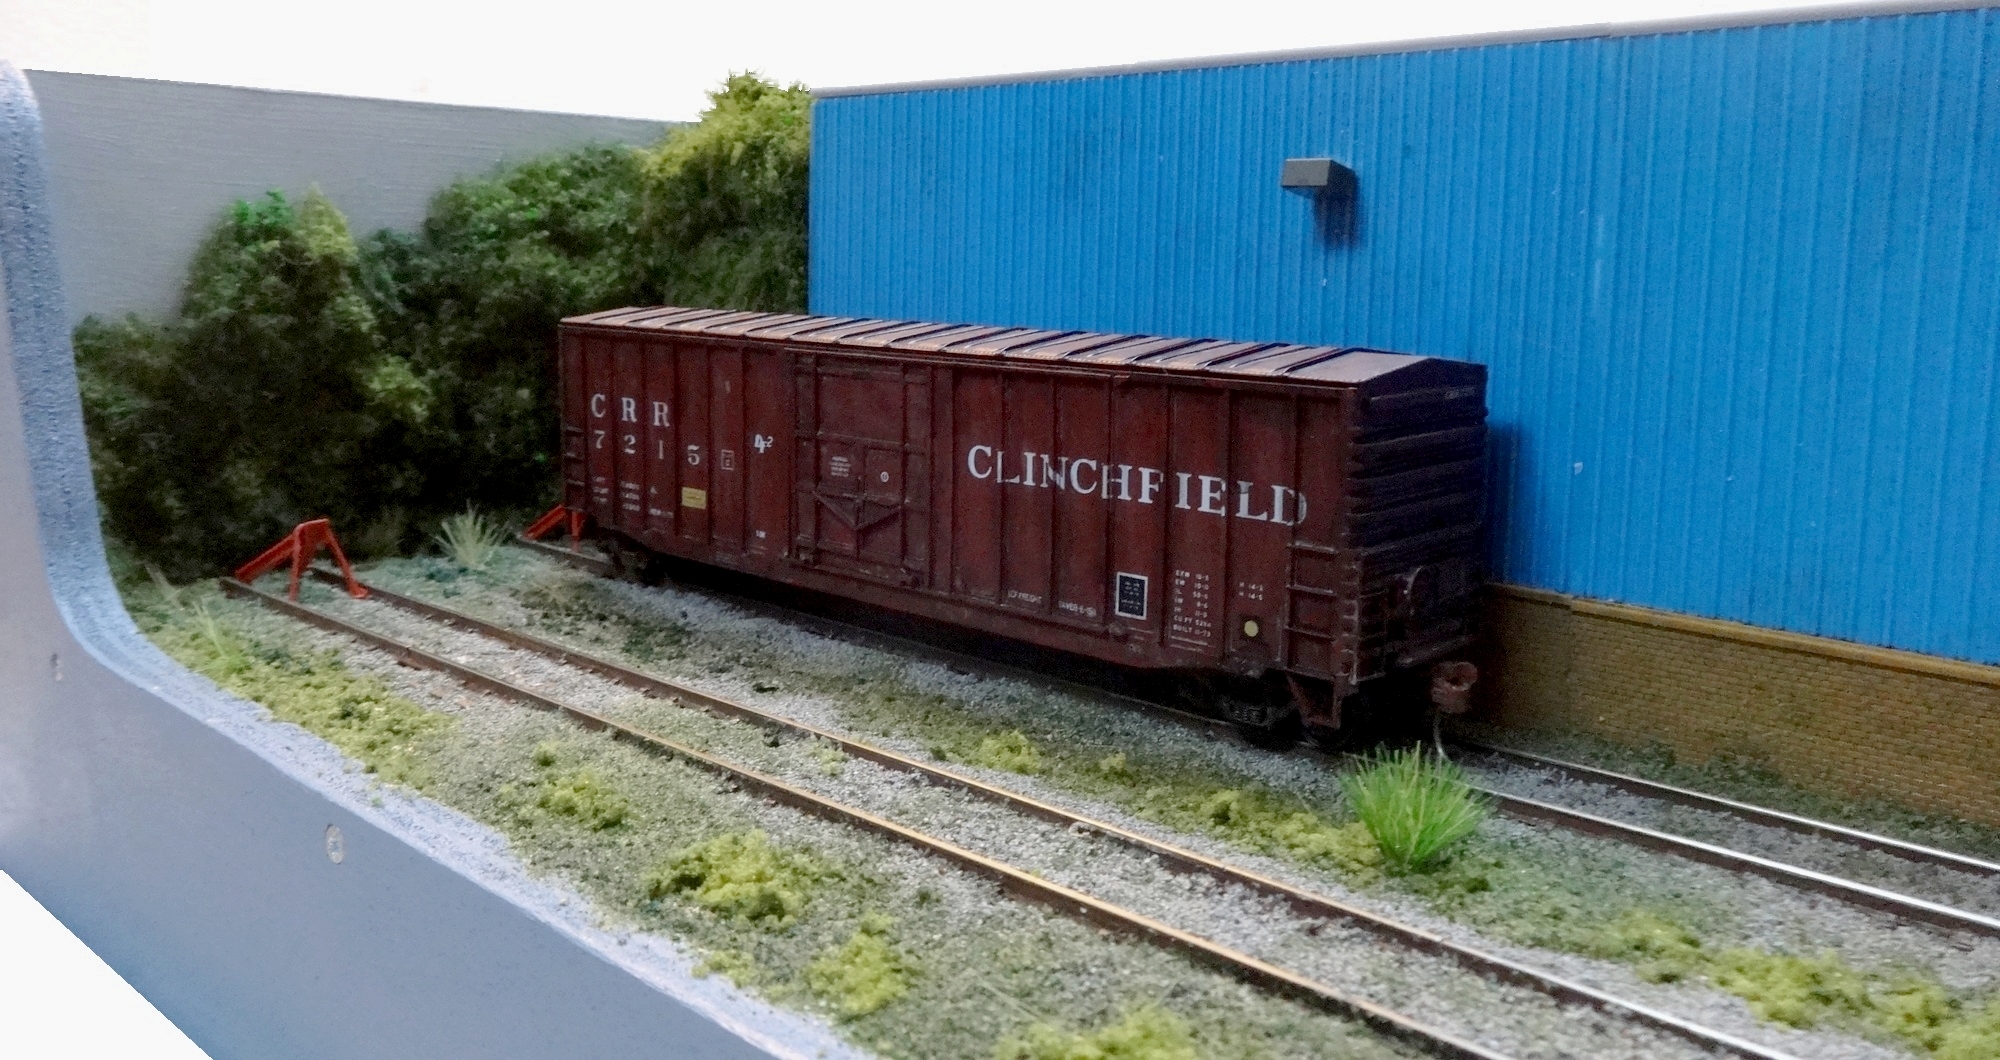
"Flats" can work
on their own, but they need to be right up to the
backscene (as the wall in the image to the left);
combining "low relief" and "ultra
low relief" buildings not only adds more
visual interest, it also reduces the possibility
of the effect not working.
|
|
| |
| For additional effect, scenic
items restricting sideways viewing even more can be
added, such as trees or industrial chimneys. |
| |
|
| |
| Low relief "stage
items" are so versatile because they work both in
the fore- and background, as well as in defining the
points "where the stage ends" - modelling just
the throat of a railway station or a tunnel portal as the
lateral end of a layout or module follows the same
approach of only showing a part of what onlookers expect
to be there "beyond what is visible". |
| |
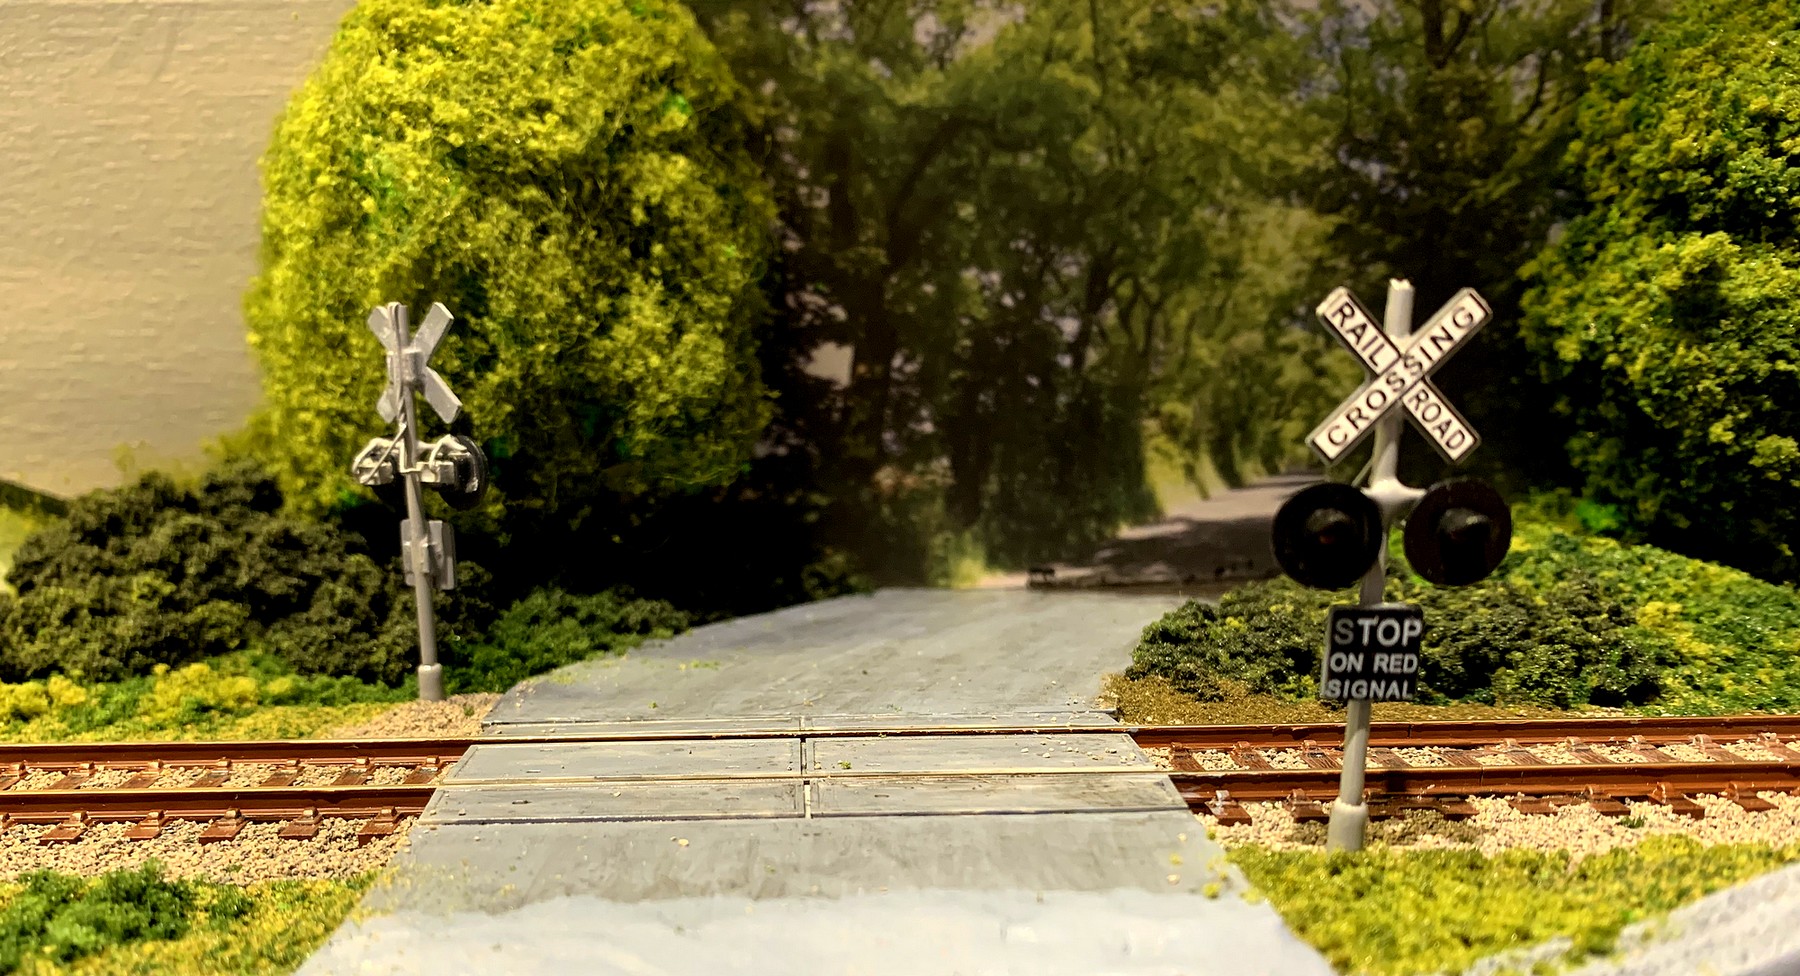
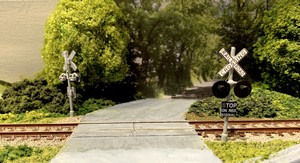
| Sometimes, several
different components are required to achieve the
illusion of "more than is actually
there". A flat photographic backscene along
with some added semi-relief props can make a
scene look threedimensional and create the
impression that, for example, a road crossing the
tracks actually leads to somewhere in the
background. |
| |
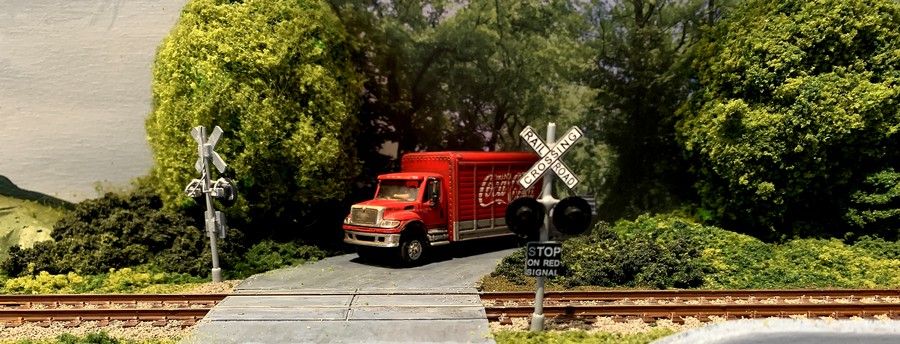
|
|
|
Additional layers of
scenery allow the foreground to blend
with the flat backscene, further enhanced
by some strategic "shadows". As
on a theatrical stage, it is all aimed at
deceiving the onlooker into believing
that the scene has more depth and reaches
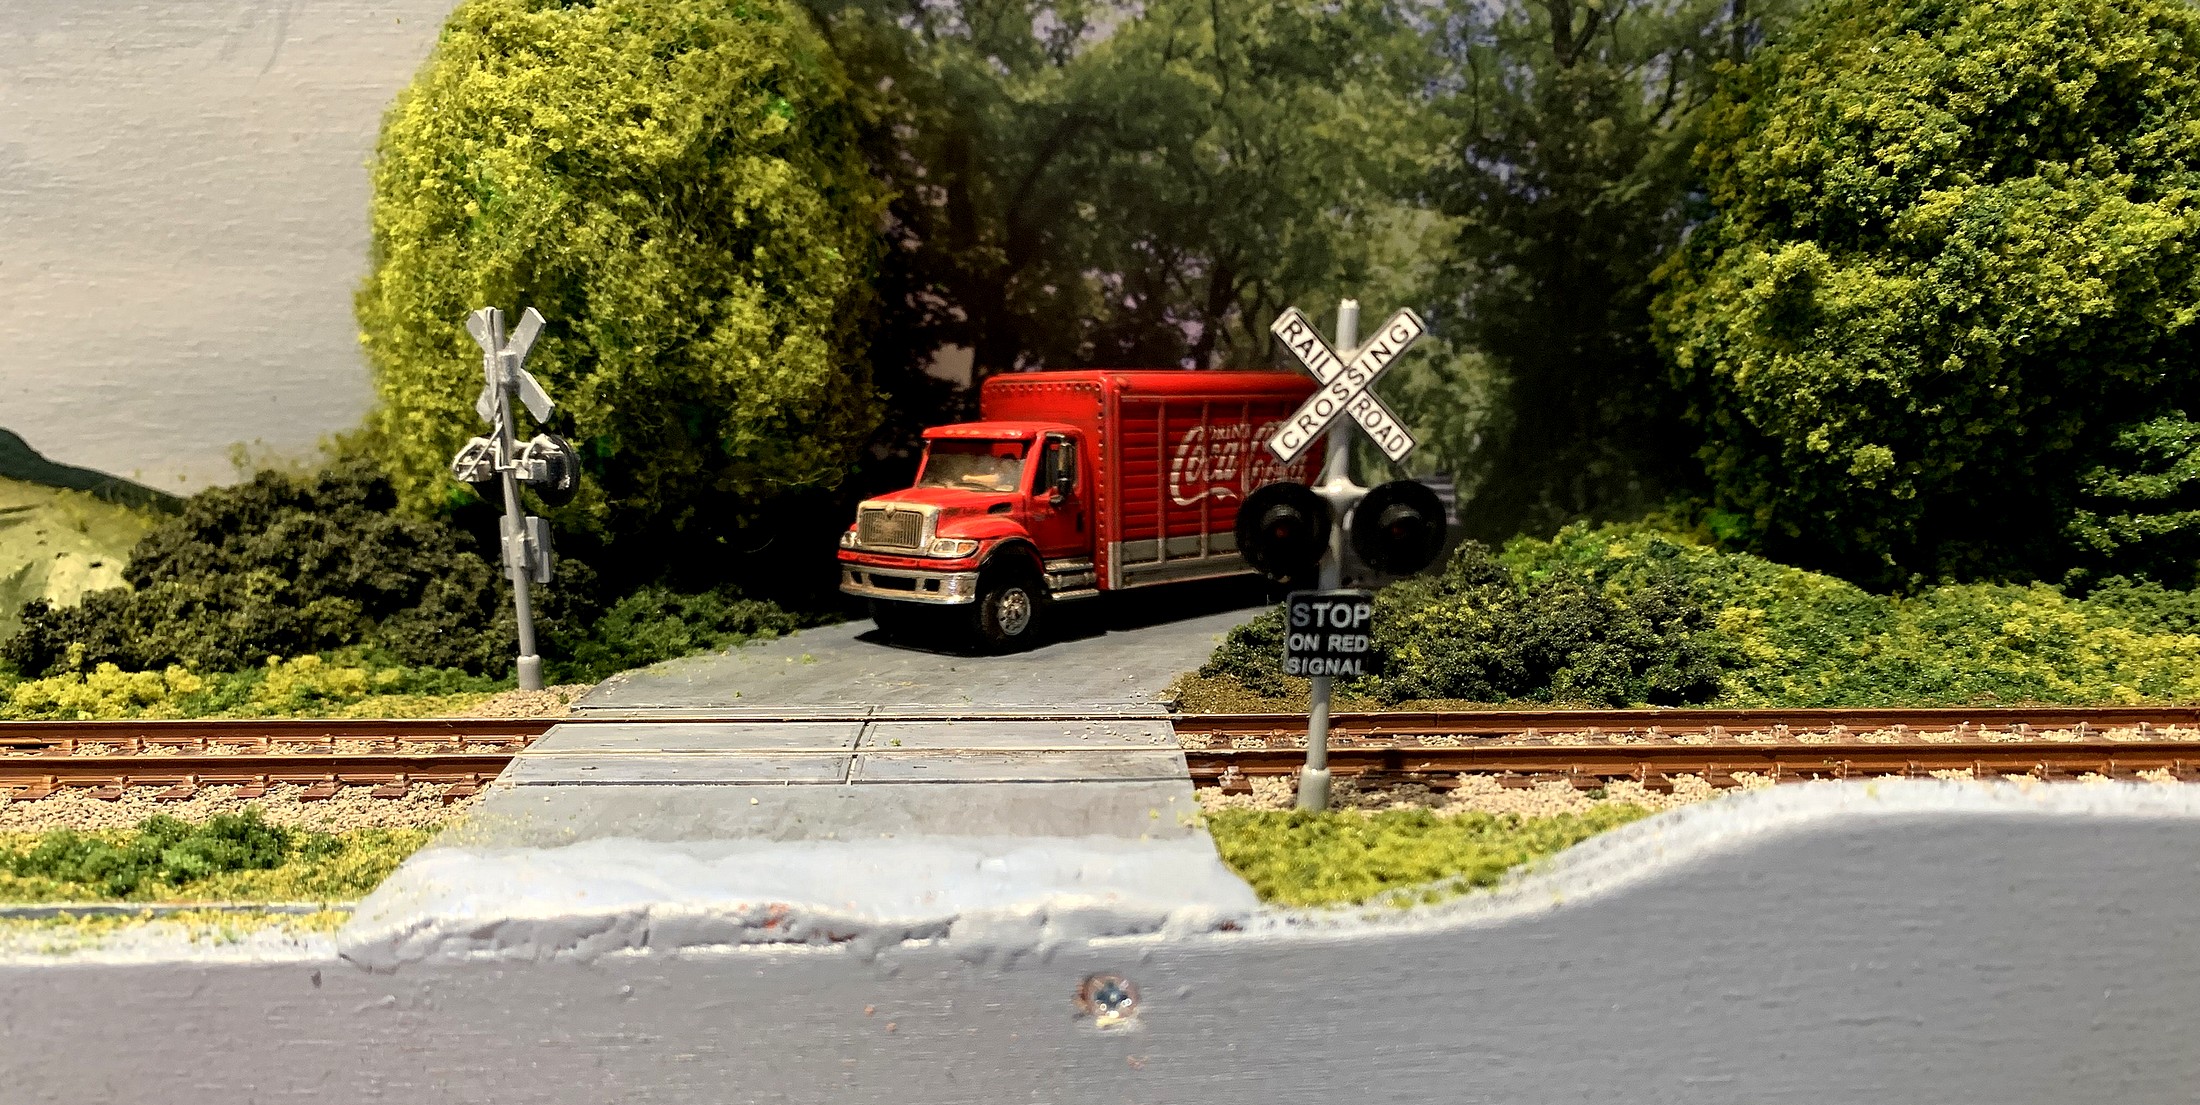
further back than it actually does. The scene (which is
only six inches deep) could be left this
way, but in order to fool even a
lingering observer a bit longer, a truck
is added to the scene, acting as a
viewblock while also deflecting attention
from the flat backdrop to an actual
three-dimensional prop in the foreground.
|
|
| |
 |
|
| |
| In order to achieve this
illusion, some further theatrical trickery is
necessary - because what seems to be a truck is
actually only part of one. Cutting down the rear
of the vehicule at a 45º angle not only allows a
longer vehicule to be squeezed into what little
space there is, it can then also be placed in a
skewed position (another theatrical trick for
props that are supposed to fool our sense of
perspective). |
|
| |
| |
BACKSCENES
|
| |
| As theatrical stages developed
into the type of setting we know today, concepts of how
to convey a certain location started to form, and this
attention was also directed towards the rear of the
stage. A solution which proved to be both straightforward
and versatile was to simply hang one or several painted
curtains at the back of the stage to indicate scenery. |
| |
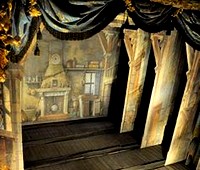 |
|
Often used in
combination with the side wings,
the function of a backdrop (as
it came to be called in US theatrical
jargon since the 1880s) is illustrated by
this elevated view of the stage of Marie
Antoinette's very own theatre
at Versailles Palace in Paris. Backdrops quickly
became an important element of stage
design, but were generally fashioned to
be rather generic representations of
"a forest", "a city
street", or "inside a
house" - which made it possible to
use the same backdrop in any number of
different plays. At the same time, no
attempt was made at providing a highly
realistic rendition of whatever was
depicted; after all, the name itself
implied that it was at the very back and
should therefore not deflect the
audience's attention from what was going
on elsewhere on the stage .
|
| |
|
|
| In the context of model
railroading, the backdrop became the background scene,
which was then contracted to backscene. A selection of such backscenes for
layouts became widely available as of the 1960s - and
most are still offered today. |
| |
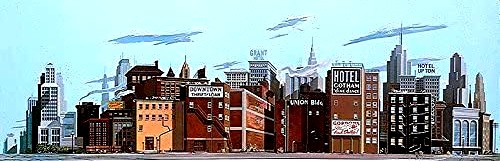
| They
all work very much like the classic
theatrical backdrop (as can be seen from
this classic Walthers "Instant
Horizons" city backscene) in that
they are clearly paintings and not
(photo)realistic renditions. Commonly
printed on a roll of paper (the example
shown here measuring 24"x36" /
60cm x 90cm), both Walthers and Peco
still offer a wide variety of different
backscenes which are designed with some
transition space to the sides so they can
even be joined up in multiples.
|
 |
|
|
| |
| These backscenes were (and still
are) advertised as an easy way to add depth and distance
between the actual scenery of a layout and its backboard,
but quaint as they may be they have also become dated and
maybe even a bit corny - besides, people get bored of
seeing the same thing over and over on different layouts.
The question of how to design their very own individual
backscene has thus become a central one for many
modellers and is directly linked to the rise in
popularity of small and shelf-style layouts. Accordingly,
there are hundreds (if not thousands) of videos, websites
and blogs dealing with the subject and offering advice. |
| |
 |
|
One school of thought aims at
creating highly realistic backdrops, and many
layouts have started using actual photographs,
either as a collage or a large landscape image
(some of the newer commercial backscenes offered
make use of this technique as well, such as those
offered by Gaugemaster in the UK, which feature
generic landscapes with background hills). The ultimate step in logic
with this approach is to just have a backdrop
working as a "blue screen" and then use
an imaging software to add an actual picture - as
Walthers did for their catalogue in advertising
their HO low relief warehouse kit - to create a
virtual backscene (just as theatres now use
projections to enhance their stage design).
|
|
| |
| A very different approach is the "less is
more" school of thought. In essence, this works on
the assumption that a backscene should be as neutral as
possible - almost as though someone was telling the
onlooker that there's nothing to see in the back and to
focus on modelled features of a layout or module. This can easily be achieved by simply
painting the backscene in a neutral and toned-down
colour, and then very lightly adding some variation to
"the sky" but without attempting to actually
render any clouds - a technique applied to the scene
shown here on a Z Scale
(1:220) module. The mood can be changed by simply
going for a different colour; a light or dark grey would
create an atmosphere of a dreary and rainy day or even of
an impending thunderstorm.
|
| |
 |
| |
| The important thing with all
types of backscenes is to ensure that there is a smooth
transition between them and the actual layout. In order
to achieve this a mixture of techniques can be used -
which may include another theatrical stage trick:
viewblocks. |
| |
| |
VIEWBLOCKS
|
| |
| This is a layout design trick
which Frank Ellison actually arrived at by turning the
staging technique of "blocking" on its head. In
a theatrical performance it is vitally important that the
audience can see what they need to see in order to follow
the events. The positions (and movements) of actors and
props therefore have to be arranged ("blocked")
with the audience's fixed viewpoint in mind - which, for
example, is why actors rarely turn their back to the
audience while reciting their lines (not even when
addressing someone situated behind them). Ellis realized
that the opposite effect of "blocking" actually
hides things from an audience, simply by putting a
"view block" in their line of sight. It is of
course a phenomenon which can be encountered in real life
time and time again: a road curving out of sight, trees
obstructing a view, even people walking into your
"shot" as you try to take a picture of
something or someone.
|
| |
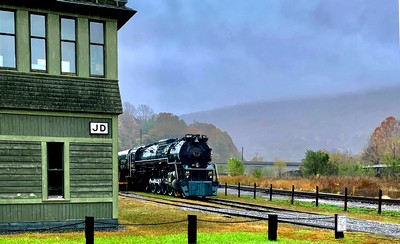
| In terms of layout design
it offers the possibility to create the
illusion that there is "more"
than can actually be seen. It also
creates the illusion of more depth to a
scene if a viewblock is positioned in the
foreground. Or it can simply hide the
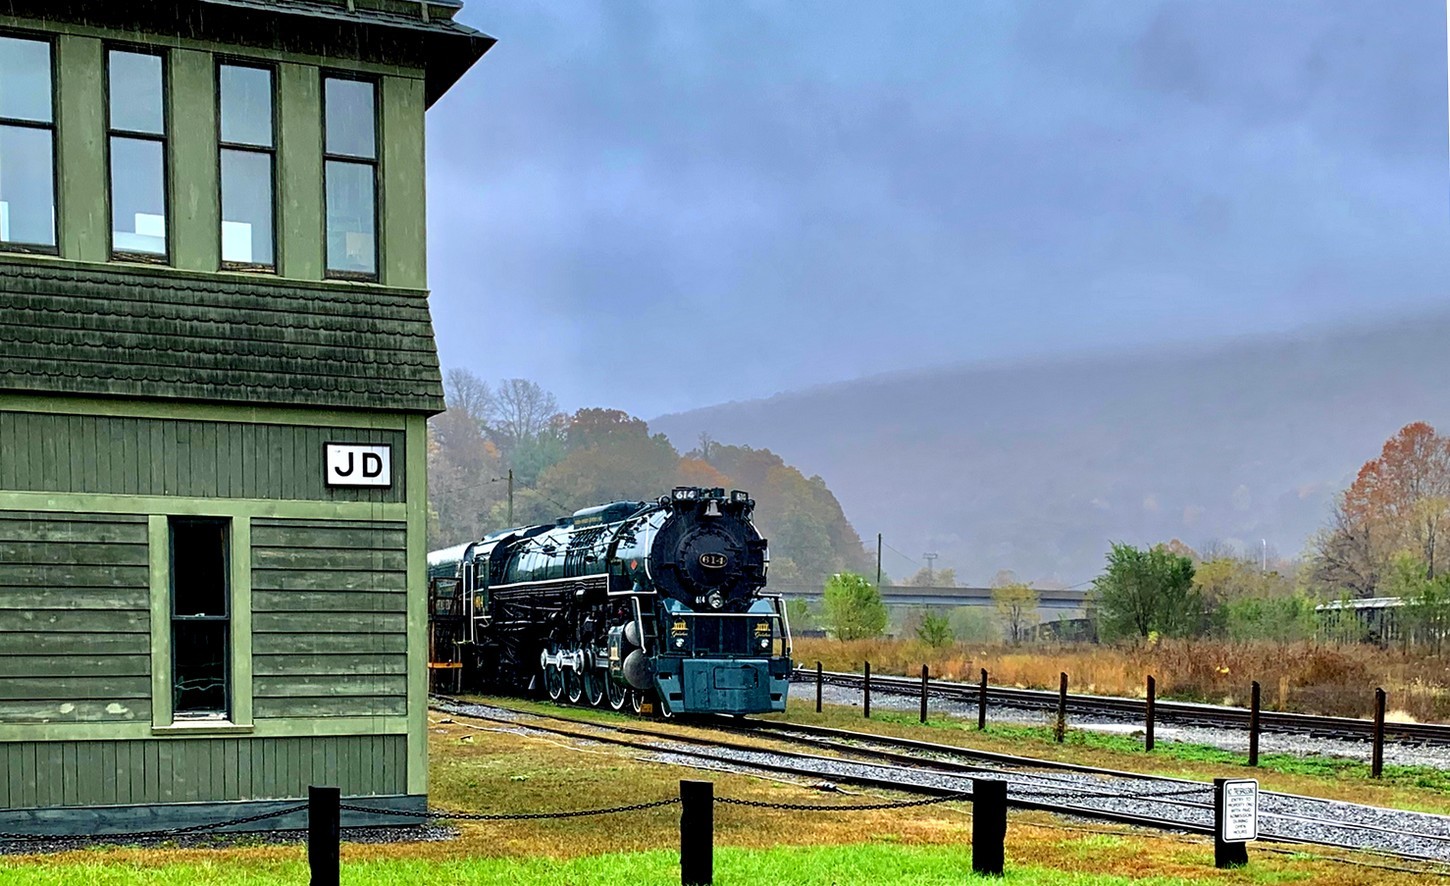
exit to "staging tracks". "JD" signal
cabin at the Chesapeake & Ohio
Railway Museum in Clifton Forge,
Virginia, evidently doesn't hide any non
existing scenery, but it illustrates the
effect a foreground prop can have on a
layout.
The possibilities
are endless, both in urban and
countryside settings (in the Z
Scale example below a few trees
placed in the foreground provide a
slightly restricted view of the tracks,
which immediately adds depth to the
scene).
|
|
 |
|
|
| |
 |
| |
|
| |
| Theatrical Layout Design doesn't, of course, have to
be applied rigidly - it works just as well if only bits
and pieces, a stage trick here and a stage setting
concept there, are applied. But taking a step back and
looking at a small (shelf) layout or a shunting puzzle
layout as something akin to a stage in a theatre can
provide some really interesting thoughts and ideas. Frank
Ellison's 1954 book Frank Ellison on Model
Railroading has been out of print for decades now
and will prove difficult to come by, but others took up
his ideas on Theatrical Layout Design, such as John Armstrong in his classic Creative
Layout Design (1978) or Carl Arendt, the late but
undisputed master of the micro layout, on the pages of
his website.
|
| |
|
| |
 |
|
|