| |
| If you're really starved for
space, or if the shunting puzzle layout will be a second
layout which will need to live side by side with a larger
layout which takes priority in terms of space, you might
also consider a less common track configuration not
necessarily known as a switching puzzle but which can be
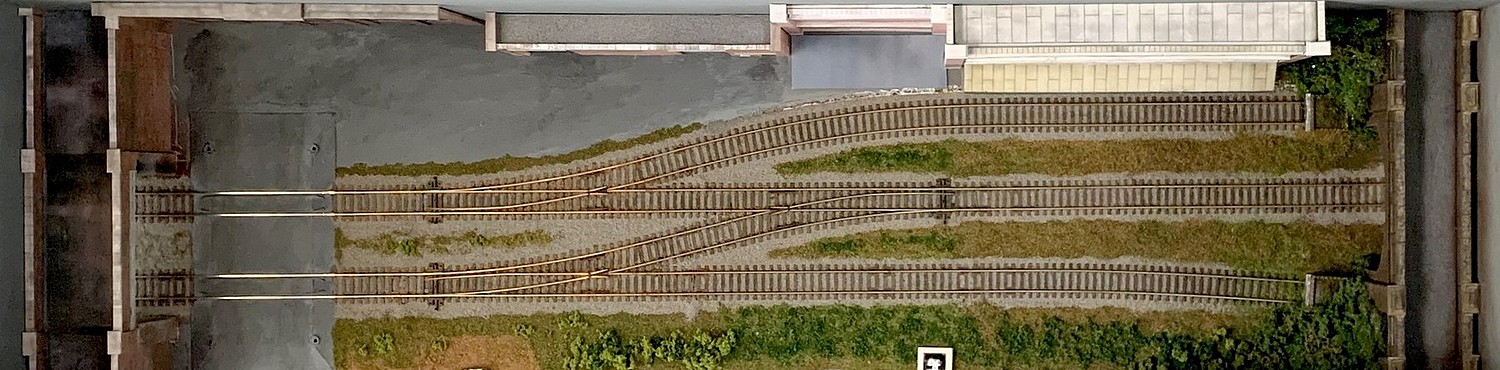
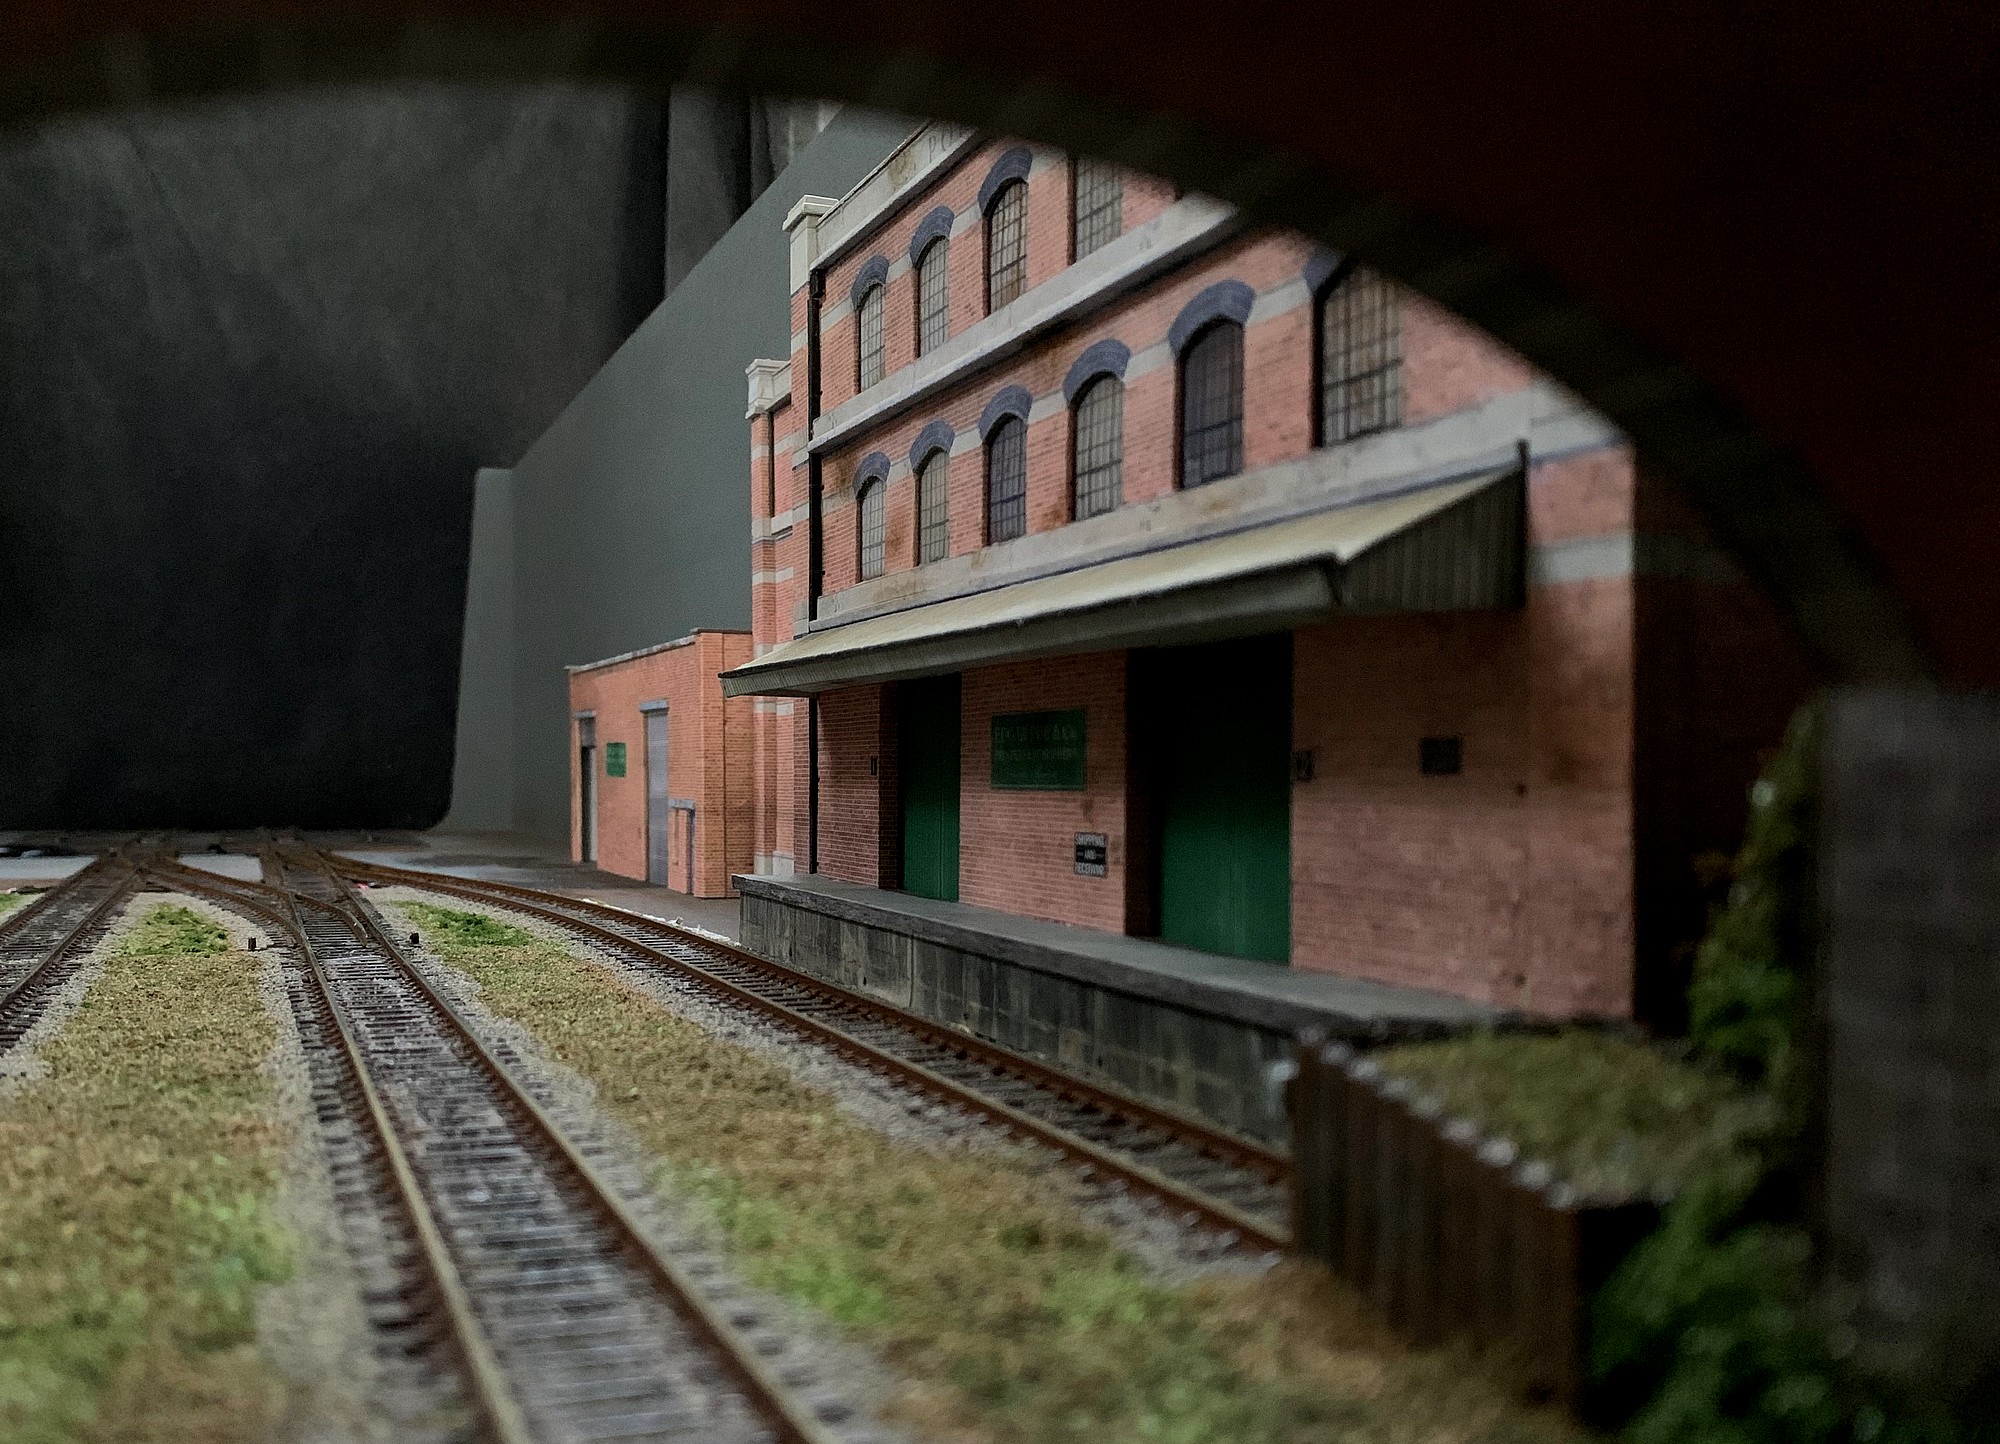
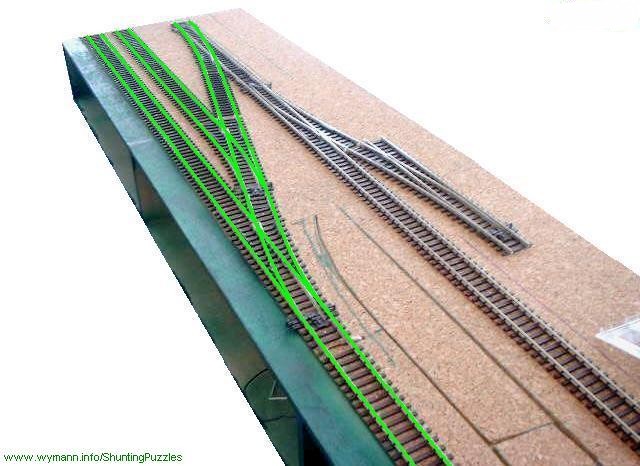
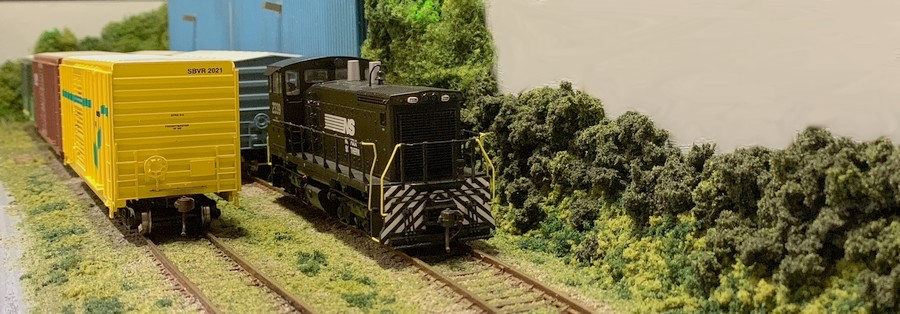
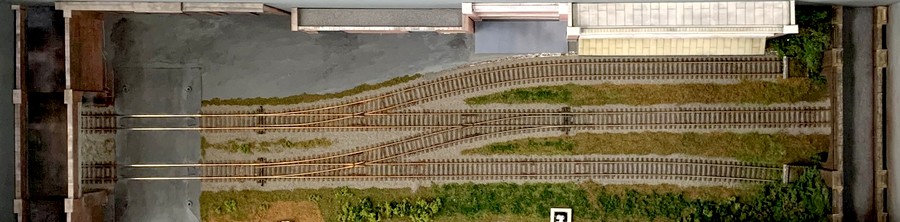
operated as one - the "tuning fork". The scene
below on my HO Pecan
Street layout fits into a width of no more than
six inches (15 cm). |
| |
 |
| |
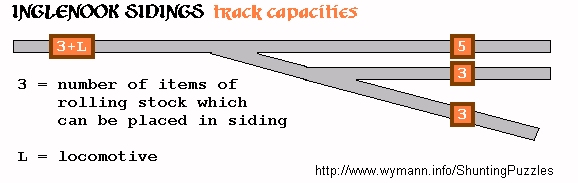
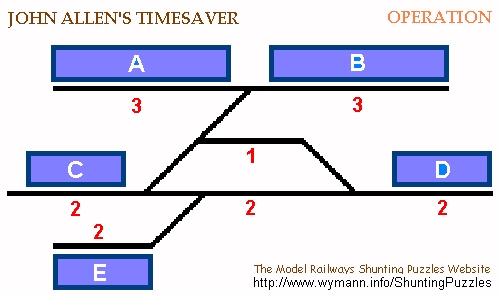
| But just how small can a
traditional shunting puzzle a la Inglenook
(actually, Timesavers aren't that much longer)
get? |
| |
| In theory, working in a smaller
scale (e.g. looking to N scale when you're mainly
modelling in H0/00) and going for sharp point
angles and tight radii will shrink your shunting
puzzle layout substantially. However - it's not a route
you should consider taking without caution, as
"sharp and tight" often spells out as
"derailments" and "stalling of
locos" - something you don't really want to
have to deal with on a shunting layout.
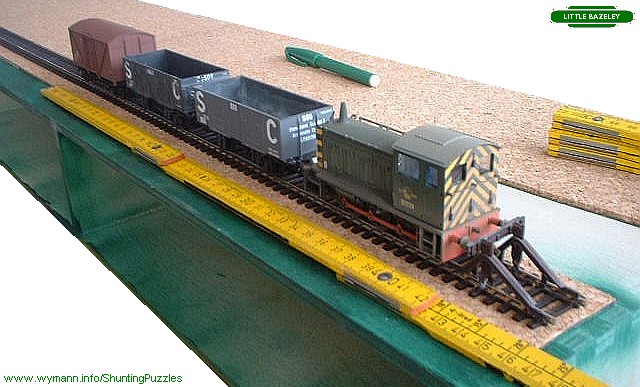
Naturally, you can
have an N scale Inglenook layout that's only 2
feet long and 7.5 inches wide. But the real
advantage N scale offers is to have a more
flowing Inglenook Sidings layout in about the
same space the original 00 scale version took up.
|
|
 |
|
| |
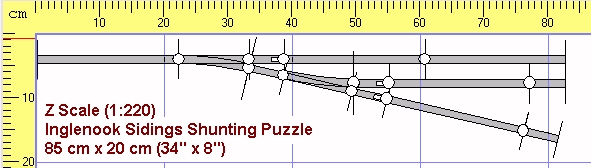
| This also explains why Z scale
(the smallest commercial railway modelling scale) won't
produce the smallest shunting puzzle layout possible.
This is due to the fact that Marklin Z
scale points are fairly generous affairs with a 490mm
(1'1-1/4") radius. |
| |
 |
|
As a result, you can't get away with
less than approx. 80-85cm (32-34") in length
for a Z scale Inglenook Sidings layout (Rokuhan
of Japan now make Z scale track with roadbed and
offer some very tight angled points in their
large choice of track geometry, but these are
clearly to be avoided for any layout that expects
to see reliable and trouble-free shunting). |
|
| |
| The bottom line then perhaps is
to be careful not to be too greedy in terms of space -
it's pretty much a law of nature that larger radius
points are less likely to cause problems when used for
repeated shunting and slow-running. No doubt medium and
small radius points can work fine, but be sure to
thoroughly check them before going much further in layout
construction, because a shunting puzzle with frequent
derailments and/or locos which stall on points and refuse
to get moving again under their own power will not
provide you with much fun. |
| |
| |
| Trackplan |
| |
| Having determined
the shunting puzzle type and layout size, the trackplan
should now be a more or less logical affair. You can
either follow the chosen shunting puzzle type's track
plan very closely, or introduce some amount of variation,
making sure that this injection of personal creativity
doesn't interfer with the requirements needed to make the
rules of the shunting puzzle work - although there's no
reason, for example, why you couldn't cut down the number
of cars of the Inglenook Sidings formula if you're
building an indoor G scale version - the important thing
is to make sure the layout is still "in
balance". The late Carl Arendt, micro layouts expert
par excellence, for example considered an Inglenook
formula of 3-2-2 (instead of the original 5-3-3) to still
be complex enough to provide interesting shunting orders.
In the end, as with almost everything in railway
modelling, it eventually boils down to a matter of taste. |
| |
| One point to bear in mind which experience has shown
to be good railway modelling sense is to make sure the
trackplan and layout built from it allows for a
self-contained shunting puzzle without the need for any
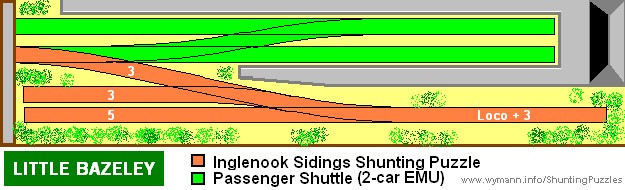
add-ons to operate it - if at all possible. The trackplan shown here allows the
shunting puzzle to fit on the 1'x4' baseboard completely,
and even though it is designed to be extended at a later
stage, it does not rely on these pipe dreams to become
reality - it is a completely self-contained shunting
puzzle layout by its own.
|
| |
|
| |
| The price for this - within the
dimensions of 1'x4' - is that modern image is, by all
practical means, ruled out as this layout size will only
accomodate fairly short freight stock. If modelling
standard gauge railways, this usually means turning back
the clock to the steam/diesel transition era. |
| |
| |
| Baseboard |
| |
| Now
that the dimensions of the future layout have been worked
out, it's time to turn to the question of baseboard
construction. Although a shunting puzzle layout will
usually be small enough to be portable in any case, it's
good to bear in mind that the traditional method of
building a frame from 4'x1' (10cm x 2,5cm) timbers
usually results in massive and very heavy baseboards. |
| |
| However,
sturdy and rigid (very important) doesn't
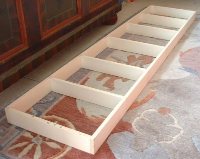
necessarily equate to heavy baseboards. One excellent option is to use 10mm
birch plywood for a framework structure which
serves as the main structural support for the
layout. It provides extra strength and rigidity
whilst at the same time keeping the overall
weight down considerably. The actual baseboard
top can then be set onto the frame, which thanks
to the spacers is rock solid and the best
insurance against warping.
There are many websites (and specialist
publications) dealing with the topic of baseboard
construction for layouts, and you will even find
instructional videos on youtube.
|
|
 |
|
| |
| Note that
regardless of whether you build your own baseboards or
buy some ready-made furniture to serve as base for your
layout, "good quality" is the key word: only a
durable baseboard which is level and won't warp will
allow you to lay track which in turn is level and true -
and stay that way. |
| |
| |
| Track |
| |
| No model railway
layout can really do with bad track, but when building a
shunting puzzle layout, it's one of the most important
things to consider. After all, you will want to be able
to run locomotives and rolling stock at low speed back
and forth and back and forth and so on. If the track on
your layout won't allow you to do that more or less
flawlessly more or less all the time, then your shunting
puzzle layout will be just as much fun as missing the
last train of the day at a lonesome country station in
the middle of nowhere. |
| |
 |
| |
| For the major
modelling gauges, there are many different makes of track
available, and very often, the choice is a matter of
personal taste and past experience. If you have neither,
you will find hat the topic has been widely discussed in
internet modelling fora. One aspect to take into consideration is that
both on the real railways as well as in modelling terms
track doesn't equal track. |
| |
| In the UK the current standard
steel rail used on standard gauge (non high-speed)
mainlines is the so-called UIC 54 rail which weighs 113
lbs per yard (54 kg/m) and has approximately 2,400
sleepers (ties in US terminology) per mile of
track. In places where the tracks are used less
frequently and/or by less heavy trains, such as in yards,
lighter rail is used for economical reasons. In the US
rail weight can vary from 80-90 lbs (small yards) to
100-110 lbs (light duty track) to 130-141 lbs (heavy duty
track, where 141 lbs is the new mainline standard).
|
| |
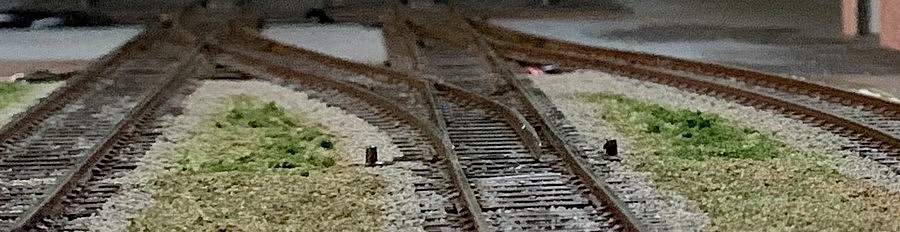
| Originally
rails were laid down in standard lengths which
were then bolted together, at 60 foot intervals
in the UK and 39 foot in the US, with the joints
allowing sufficient space for
expansion. Whereas the UK placed the joints
side by side, they were always staggered in the
US - which accounts for the curious dipping and
swaying of freight cars running on poorly
maintained track. Today, track is welded into
lengths of up to several hundred metres, and
expansion is minimised by installing and securing
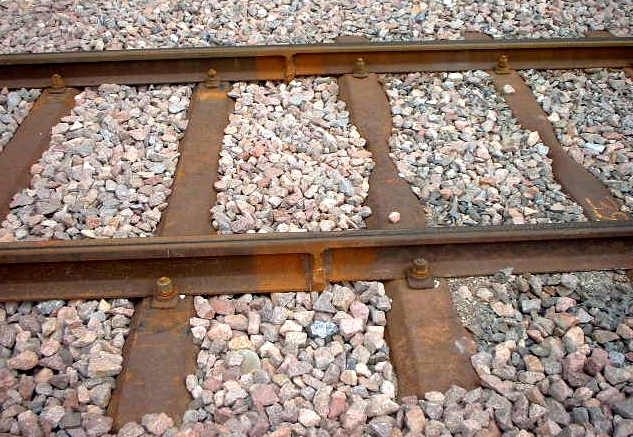
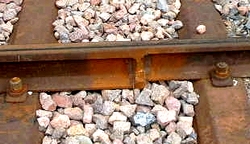
the rails in tension. Sleepers are traditionally
wooden (mostly oak in the US) and impregnated
with preservative (soaked in creosote in the US),
which will make them last up to 25
years. Other materials used are steel (seen
here at a Swiss industrial siding and also
illustrating the "transition spot" from
heavier to lighter rail) and concrete. |
|
 |
|
| |
| All of this means that simply by looking at the rails
it is often quite clear whether the track in question is
a modern heavy duty main line or a lightly used siding in
a yard laid decades ago. In modelling terms, this
translates into a wide selection of track. The choice between track with either
wood or concrete ties (which obviously you do not want on
a shunting puzzle) is now available even in Z Scale, and
steel sleepered track is available in 00/HO, but far more
important for a shunting puzzle are the various
"codes" of rail offered, which refers to its
height in thousandths of an inch. In the most popular
modelling scale 00/H0 the different codes on offer are
100, 83 and 75, therefore indicating a rail height of
.100", .083", and .075".
|
| |
 |
|
The long established standard
also used for set track is code 100. It has the
disadvantage of being noticeably out of scale,
although careful ballasting and weathering can go
a long way in hiding this. On the up side, most
old stock will run on it without problems and the
track is sturdy and reliable. Code 75 track on the other
hand is often refered to as "finescale"
and has a much lighter and slimmer (and therefore
more realistic) appearance. Its main disadvantage
is its more fragile nature and the fact that most
older stock will not be able to run on it due to
deep wheel flanges.
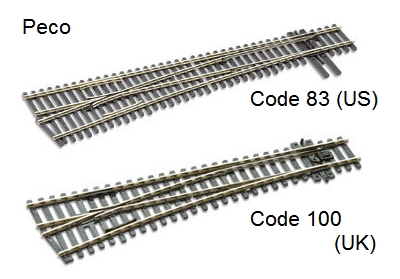
A specialty is code 83
track which not only has a finer rail profile but
is also modelled on US track characteristics.
These differ markedly from UK and European
standards - one element immediately visible is
the higher number of ties (sleepers) used. In the
case of point trackwork, differing construction
methods are apparent also.
|
|
| |
| The choice of code
is therefore not only dependent on aspects of
reliability, appearance and compatibility, but also of
prototype modelled. And don't forget that the track also
has to deliver power to your locomotives. Even with DCC
it's certainly a good idea to have a couple of power
feeds even on a short layout. |
| |
| |
| Points (Switches) |
| |
| Perhaps the most important aspect of
track on a shunting puzzle layout are the points (switches
in American railroad terminology), primarily because, for
obvious reasons, they will have to work flawlessly.
Applying extra care in laying, weathering and ballasting
points therefore simply is compulsory. But before
actually installing the points, you will have to decide what
kind of points you are going to use. |
 |
|
As with plain
track, there's a wide selection of different
brands to choose from, but more importantly there
are differences in terms of frog angle and radius
(the frog is the part of a point where the
curved rail for the diverging line crosses the
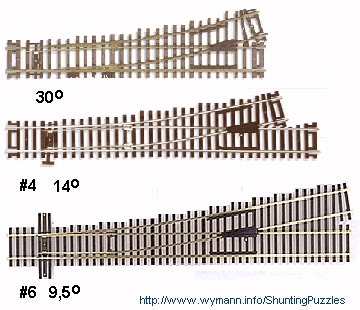
straight rail). In the UK and
on the European continent, the angle is usually
indicated directly in terms of degrees (e.g.
"12 degrees"); in the US, a numerical
system for the frog is used (e.g. #4, where the
diverging rails are one unit apart when measured
four units past the point of the frog, i.e. a #4
frog takes 4 inches to diverge 1 inch). Therefore, a higher frog angle in
degrees (or a smaller frog number) means a
sharper set of points.
It is
obvious straight away that sharp points have an
advantage if you're thinking of building a small
layout: they are a lot shorter than points with
higher frog numbers. That's why so many
trackplans for small layouts feature sharp
points, often from a range of sectional track.
However,
there's a big catch to such "shorty"
points: some of them are simply derailing devices
for all but a few pieces of rolling stock when
you need to push cars onto the diverging track -
and some won't even let you pull anything but the
shortest goods vans out of the diverging siding
without wheels jumping the rails.
|
|
| |
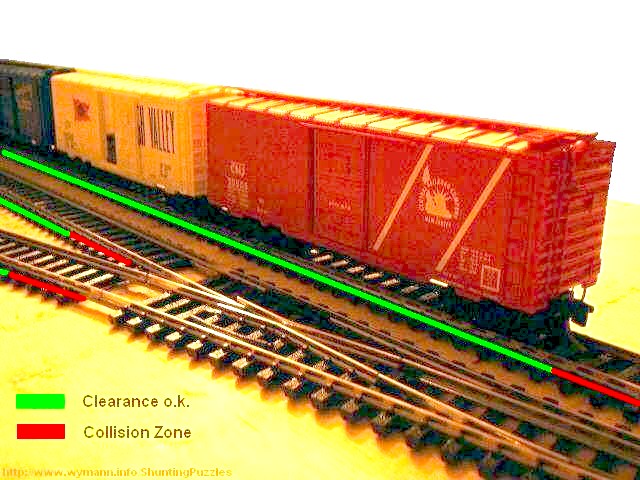
| The reason for this is, of course,
that there is a horizontal force acting on the
wheels moving in a curve. We all know from practical
experience that objects which are in motion want to move
on in as straight a line as possible once they're moving.
In other words: rolling stock which is moving and sent on
to the diverging track of a point is actually set to
carry straight on. This conflicting situation also
produces additional friction force of the wheels on the
outer rail, which has to prevent the wheels from going
straight on - and derailing. Sharply
angled points therefore put a lot of strain on the wheels
of moving rolling stock, and unless you can move them
really s-l-o-w-l-y, you will end up with far too many
derailments to make operating the layout fun. The only
way to reduce the horizontal as well as the friction
forces is to choose points which flow more easily. If at
all possible, try to avoid anything sharper than a #4 or
14 degrees frog angle (Peco "Streamline"
points, both small and medium radius, have a 12 degrees
frog angle but work fine from my own experience; on the
other hand, Kato N scale Unitrack #4 switches are known
to frequently cause derailments unless
"tuned").
It should be remembered that
shunting puzzle layouts don't by definition fall into the
category of "micro layouts" - sharp points
really should only be used if lack of space leaves no
other option. The extra length this adds
to the layout is well worth it.
|
| |
 |
| |
| Another aspect of points which used to be of some
importance and which continues to be a topic of heated
discussions is the difference between (to use the Peco terminology)
"electrofrog" points (which have a
"live" frog and require a certain amount of
wiring in order to change the polarity of the frog
according to how the points are set) and
"insulfrog" points (which have an electrically
insulated frog and require no extra wiring to operate) -
and which ones to use. Many modellers won't touch
"insulfrog" points. However, the only reason
why "Electrofrog" points were made in the first
place was the bad electrical pickup in older models and
subsequent stalling on electrically "dead"
frogs. But since this is no real problem with more recent
locomotives and older ones can easily be improved, the
extra wiring required to switch the polarity of the frog
in snyc with how the point is set seems rather a lot of
trouble for no real gain - which is probably also why
Peco introduced the "Unifrog" point in 2017; out
of the package it will behave like an
"insulfrog" point but the frog can be made to
act like an "electrofrog".
|
| |
| Some makes of points / switches,
on the other hand, come with current carrying frogs and
ready installed power routing, such as Kato's N gauge UNITRACK - the #4 switches come with
factory installed power routing, but by simply changing a
screw the switches can be set to be non-power routing,
whereas the #6 switch is permanently power-routing. Other
options exist for other brands and scales (such as
Rokuhan's power routing points for Z scale), and it is
worth checking before deciding on a specific product
line. |
| |
| |
   
|
Page created:
24/JUN/2002
Last revised: 28/MAY/2023
|